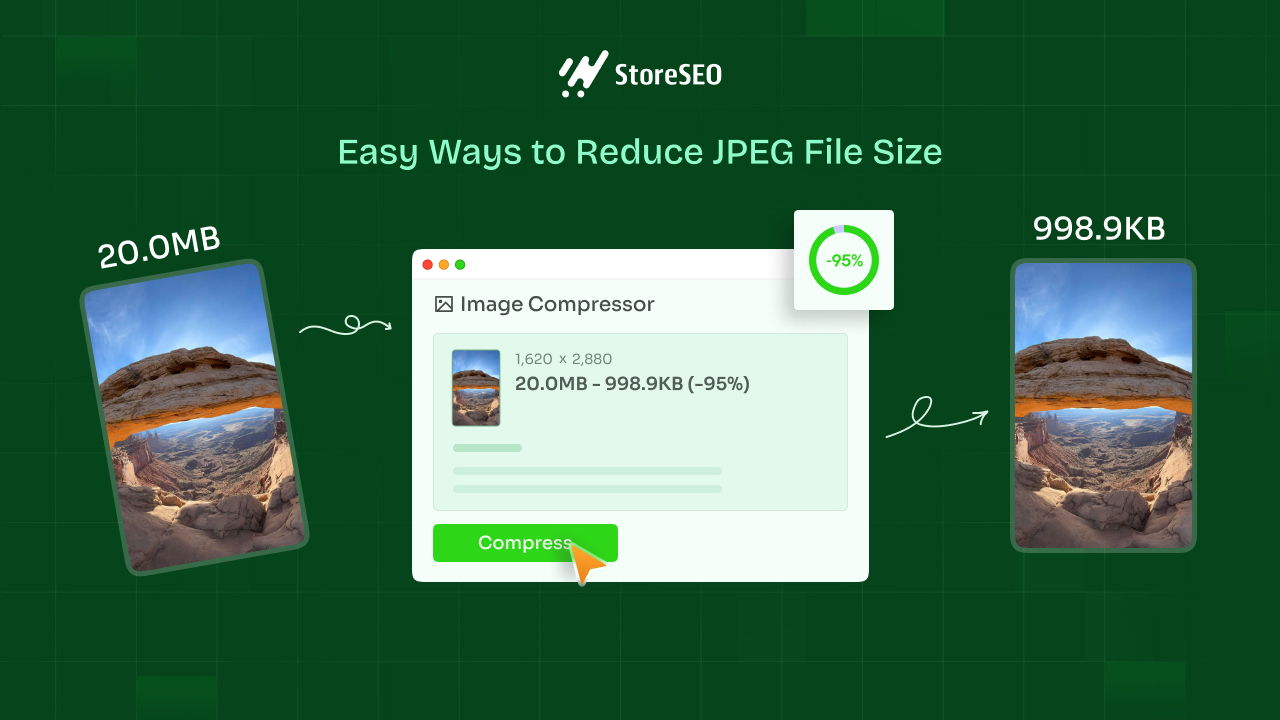
Vous recherchez une solution pour réduire la taille du fichier Jpeg à compresser les images pour un site plus rapide ? Les boutiques en ligne et les hébergeurs Web, tels que Shopify, apprécient les fichiers image JPEG en raison de leur taille de fichier relativement petite. Ce guide vous montre comment compression d'image qui vous permettent d'accélérer le temps de chargement de votre site sans perdre la qualité de l'image.
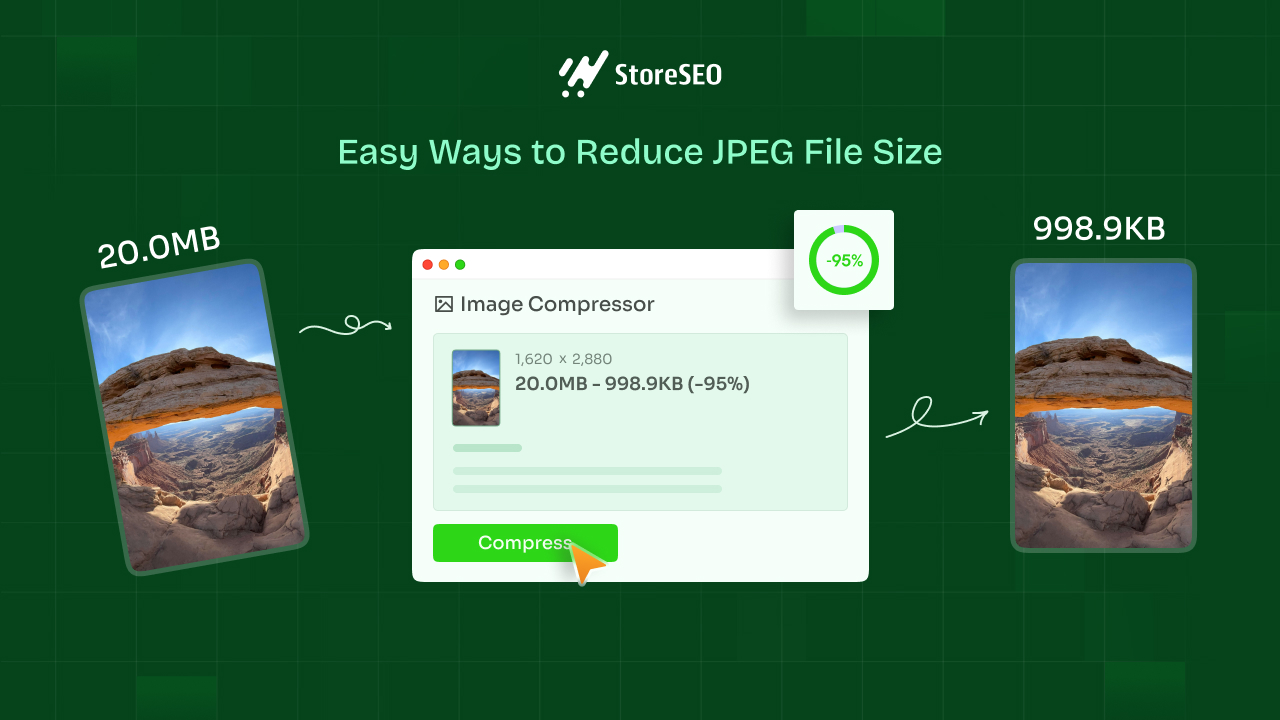
L'optimisation des images joue un rôle essentiel dans l'amélioration des performances d'un site Web. Les images volumineuses et non optimisées peuvent ralentir considérablement le temps de chargement des pages, ce qui entraîne une mauvaise expérience utilisateur et peut affecter le classement des moteurs de recherche. En optimisant les images, les développeurs Web et les créateurs de contenu peuvent s'assurer que leurs sites se chargent plus rapidement et offrent une expérience plus fluide et plus attrayante aux visiteurs.
La compression d'image est une technique clé dans ce processus d'optimisation. Elle réduit la taille des fichiers d'images en supprimant les données redondantes, ce qui accélère les temps de chargement et réduit les coûts de stockage. Malgré la réduction de la taille du fichier, une compression efficace maintient une qualité d'image acceptable, garantissant que l'attrait visuel n'est pas sacrifié aux performances.
Ce blog présente cinq méthodes simples pour réduire la taille d'un fichier JPEG sans compromettre la qualité de l'image. En appliquant ces méthodes, vous pouvez optimiser efficacement les images, en équilibrant qualité et performances pour améliorer l'efficacité de votre site Web et l'expérience utilisateur.
Comprendre la compression JPEG
Le format JPEG réduit la taille des images en supprimant des informations que nous ne remarquons pas vraiment. Il divise une image en petits morceaux, puis les simplifie. Cela permet d'économiser de l'espace, mais cela signifie également que l'image peut ne pas ressembler exactement à l'original.
Vous pouvez choisir le niveau de détail à conserver lors de l'enregistrement d'un fichier JPEG. Si vous souhaitez un fichier de très petite taille, vous perdrez davantage de détails et l'image risque d'être un peu floue ou en blocs. Si vous souhaitez conserver la plupart des détails, le fichier sera plus volumineux.
L'astuce consiste à trouver le bon équilibre entre une petite taille de fichier et une belle image. La plupart des gens utilisent un réglage qui donne une assez bonne image sans rendre le fichier trop volumineux.
5 façons de réduire la taille d'un fichier JPEG
Les fichiers JPEG volumineux peuvent ralentir considérablement votre site Web, frustrant les visiteurs et nuisant à votre classement dans les moteurs de recherche. Vous pouvez améliorer l'expérience utilisateur et l'efficacité globale de votre site Web en compressant les images sans compromettre la qualité. Voici 5 méthodes efficaces pour réduire la taille des fichiers JPEG :
Méthode 1 : redimensionner l'image à l'aide de Windows
Le redimensionnement d'une image peut réduire considérablement sa taille de fichier sans compromettre la qualité. Cette méthode vous guidera dans le redimensionnement d'une image JPEG à l'aide de l'application Paint intégrée dans Windows. Suivez le guide étape par étape ci-dessous pour réduire la taille de votre fichier JPEG dans Windows.
Étape 1 : Ouvrir l'image
Localisez l'image JPEG que vous souhaitez redimensionner sur votre ordinateur. Cliquez avec le bouton droit sur le fichier image et sélectionnez «Ouvrir avec" alors choisis "Peinture' application.

Étape 2 : redimensionner l'image
Une fois l'image ouverte dans Paint, allez dans «Déposer' menu, puis 'Propriétés de l'image'. Une nouvelle fenêtre apparaîtra. Ajustez la taille de l'image pour réduire la taille'largeur' et 'hauteur'. Cliquez sur 'D'ACCORD" pour appliquer les modifications.
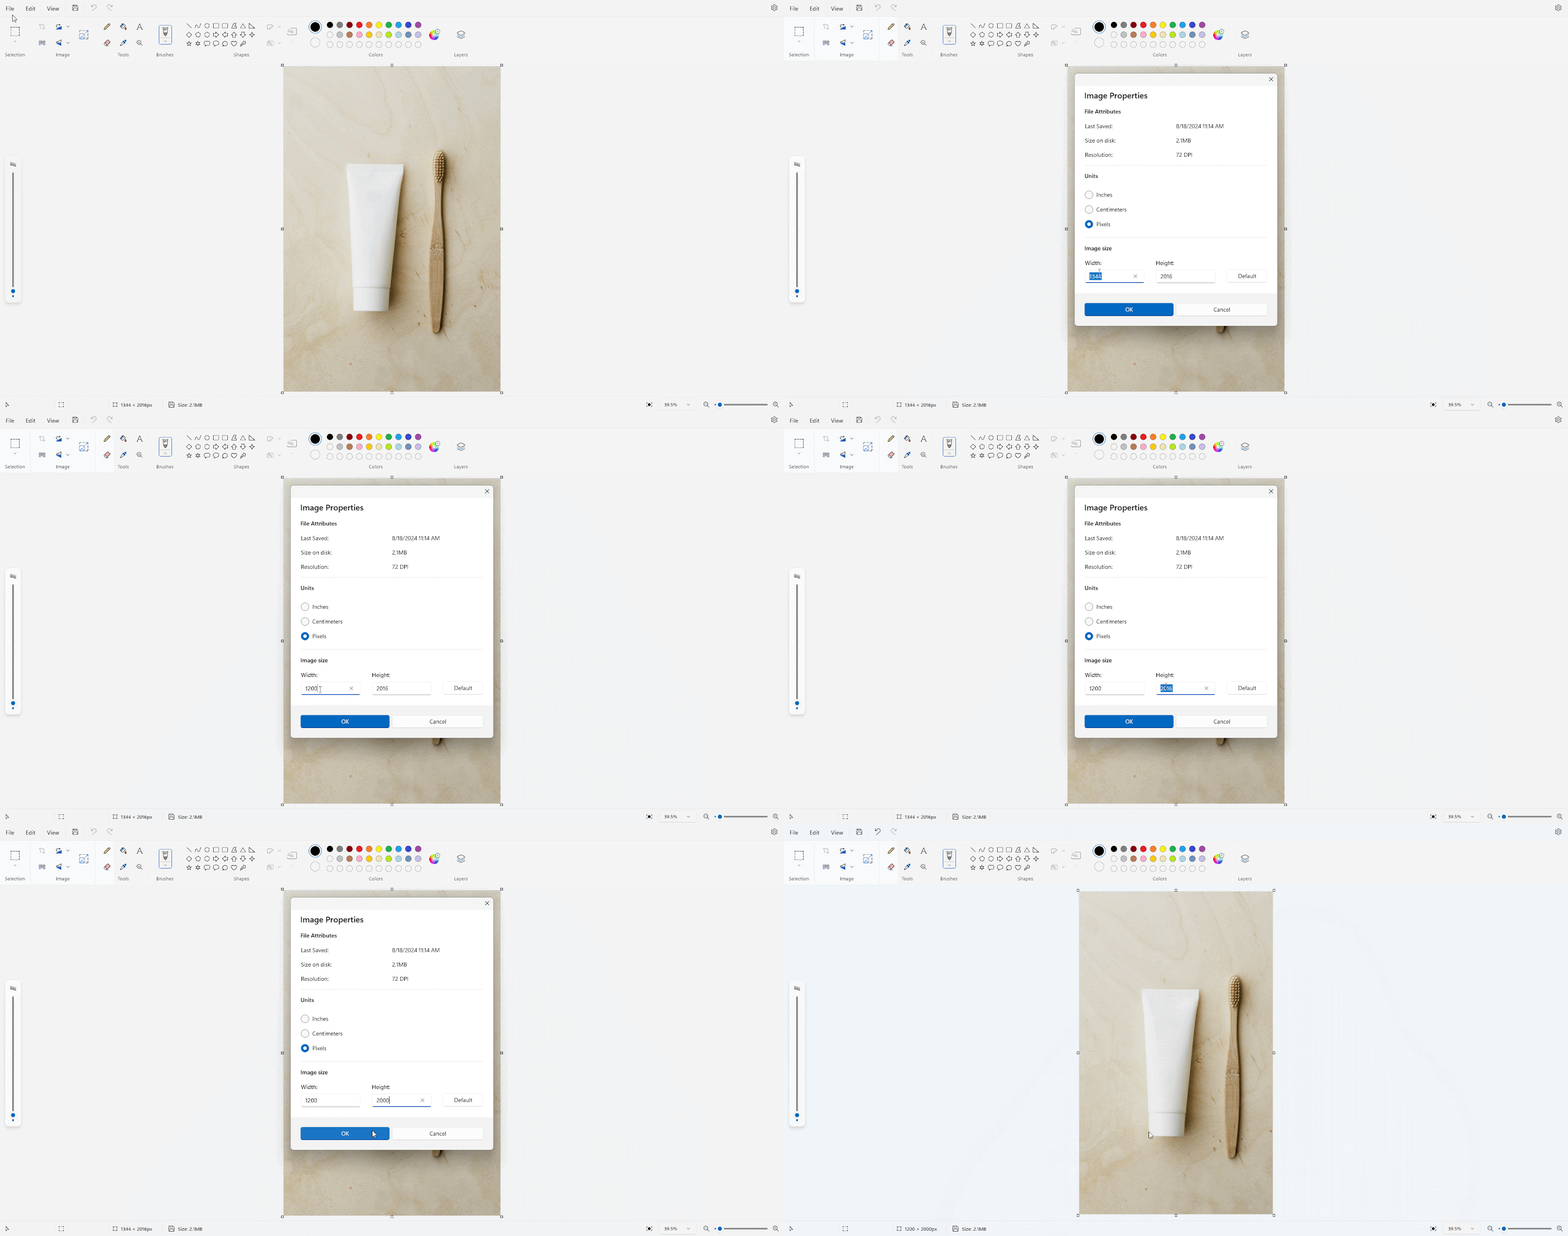
Étape 3 : Enregistrer l'image
Cliquez sur le 'Déposer' menu et sélectionner 'Enregistrer sous' puis définissez le type d'image sur 'Image JPEG (.jpg)." Choisissez l'emplacement souhaité pour enregistrer l'image redimensionnée. Cliquez sur "Sauvegarder" pour enregistrer l'image.
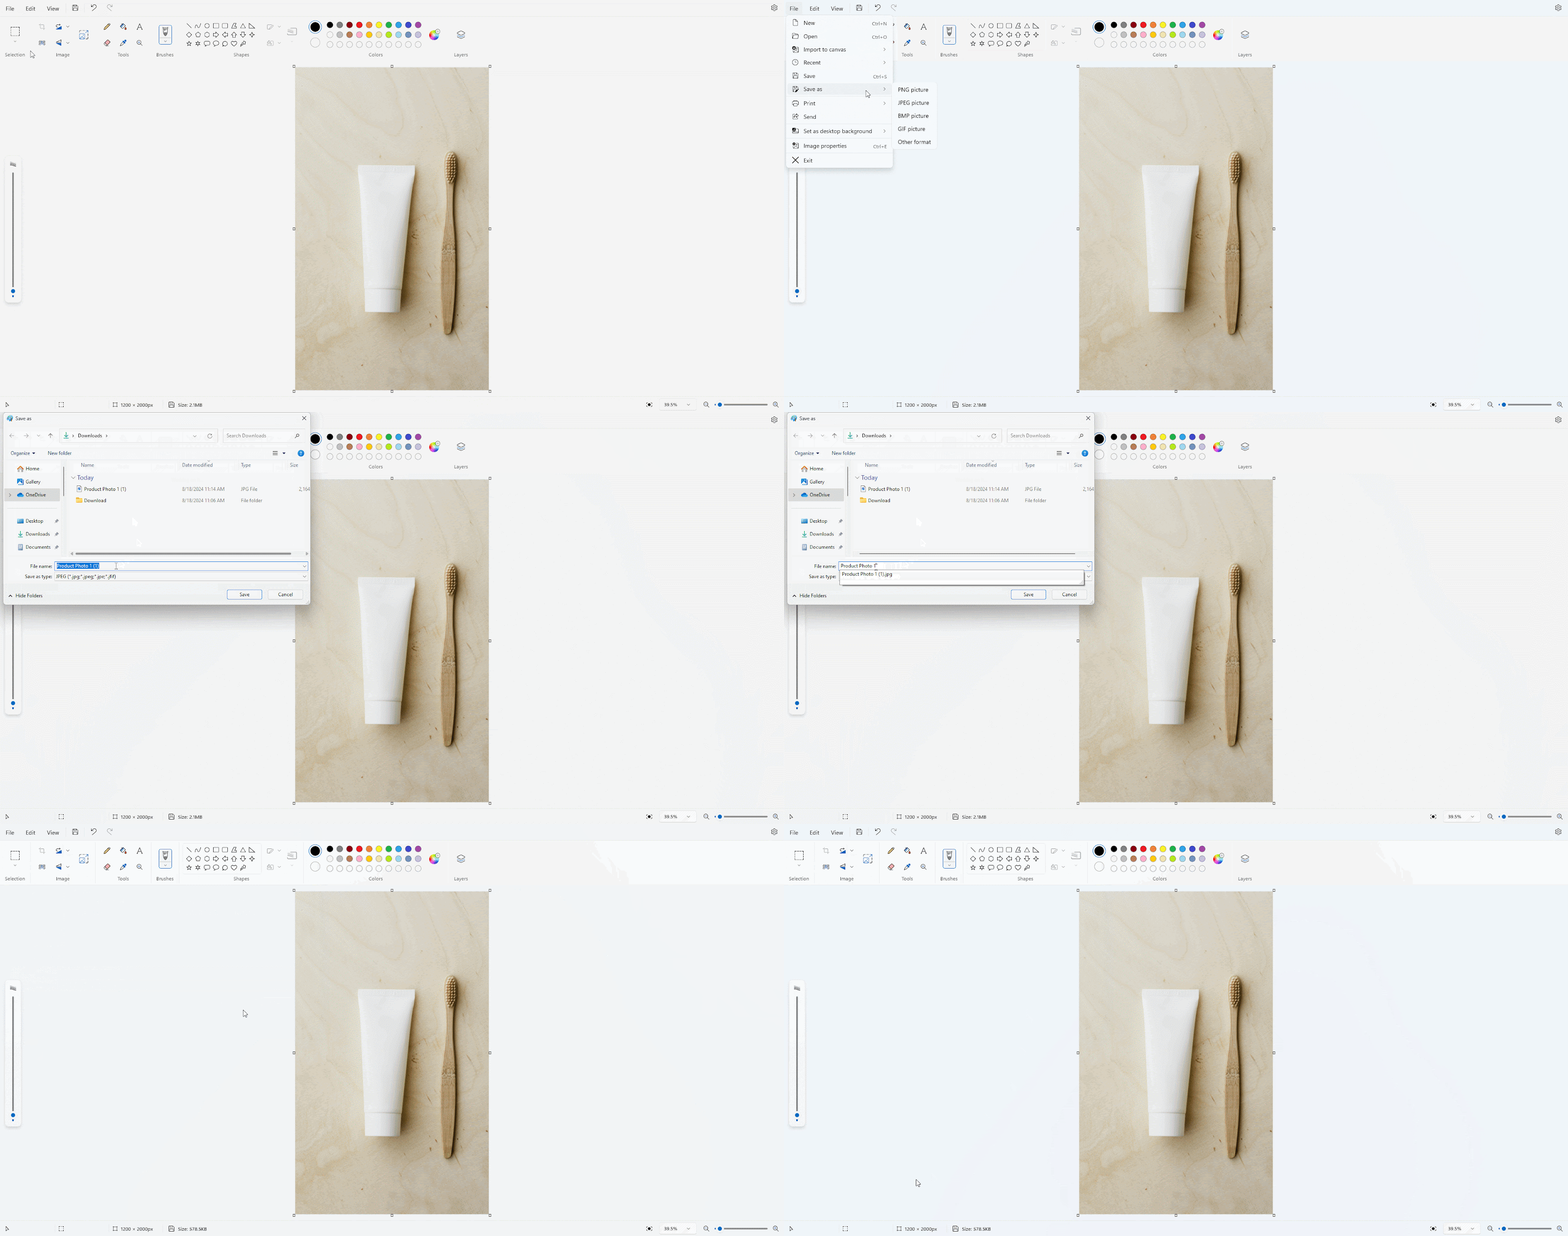
En suivant ces étapes, vous avez réussi à redimensionner votre image JPEG à l'aide de l'application Windows Paint. Cette méthode est un moyen rapide et facile de réduire la taille du fichier tout en préservant la qualité de l'image dans une mesure raisonnable. N'oubliez pas d'utiliser un logiciel de retouche d'image dédié pour des options de redimensionnement plus avancées et une meilleure préservation de la qualité.
Méthode 2 : ajuster la qualité de l'image à l'aide d'un outil de conception en ligne
Lorsque vous enregistrez une image JPEG, une qualité supérieure signifie que l'image est plus belle, mais le fichier est plus volumineux. Une qualité inférieure signifie que l'image est plus petite, mais son apparence peut être un peu moins bonne.
Canva est un outil de conception en ligne polyvalent qui offre également des fonctionnalités d'édition d'images. Une façon de réduire la taille d'un fichier JPEG consiste à ajuster la qualité de l'image. Cette méthode vous guidera tout au long du processus d'optimisation de la qualité de l'image à l'aide de Canva. Vous trouverez ci-dessous les étapes à suivre pour réduire la taille d'un fichier image JPEG.
Étape 1 : Télécharger et ouvrir l'image sélectionnée dans Canva
Depuis le tableau de bord Canva, cliquez sur «Créer un design' et sélectionnez 'Importer un fichier' pour télécharger votre image JPEG sélectionnée et sélectionner la taille souhaitée.
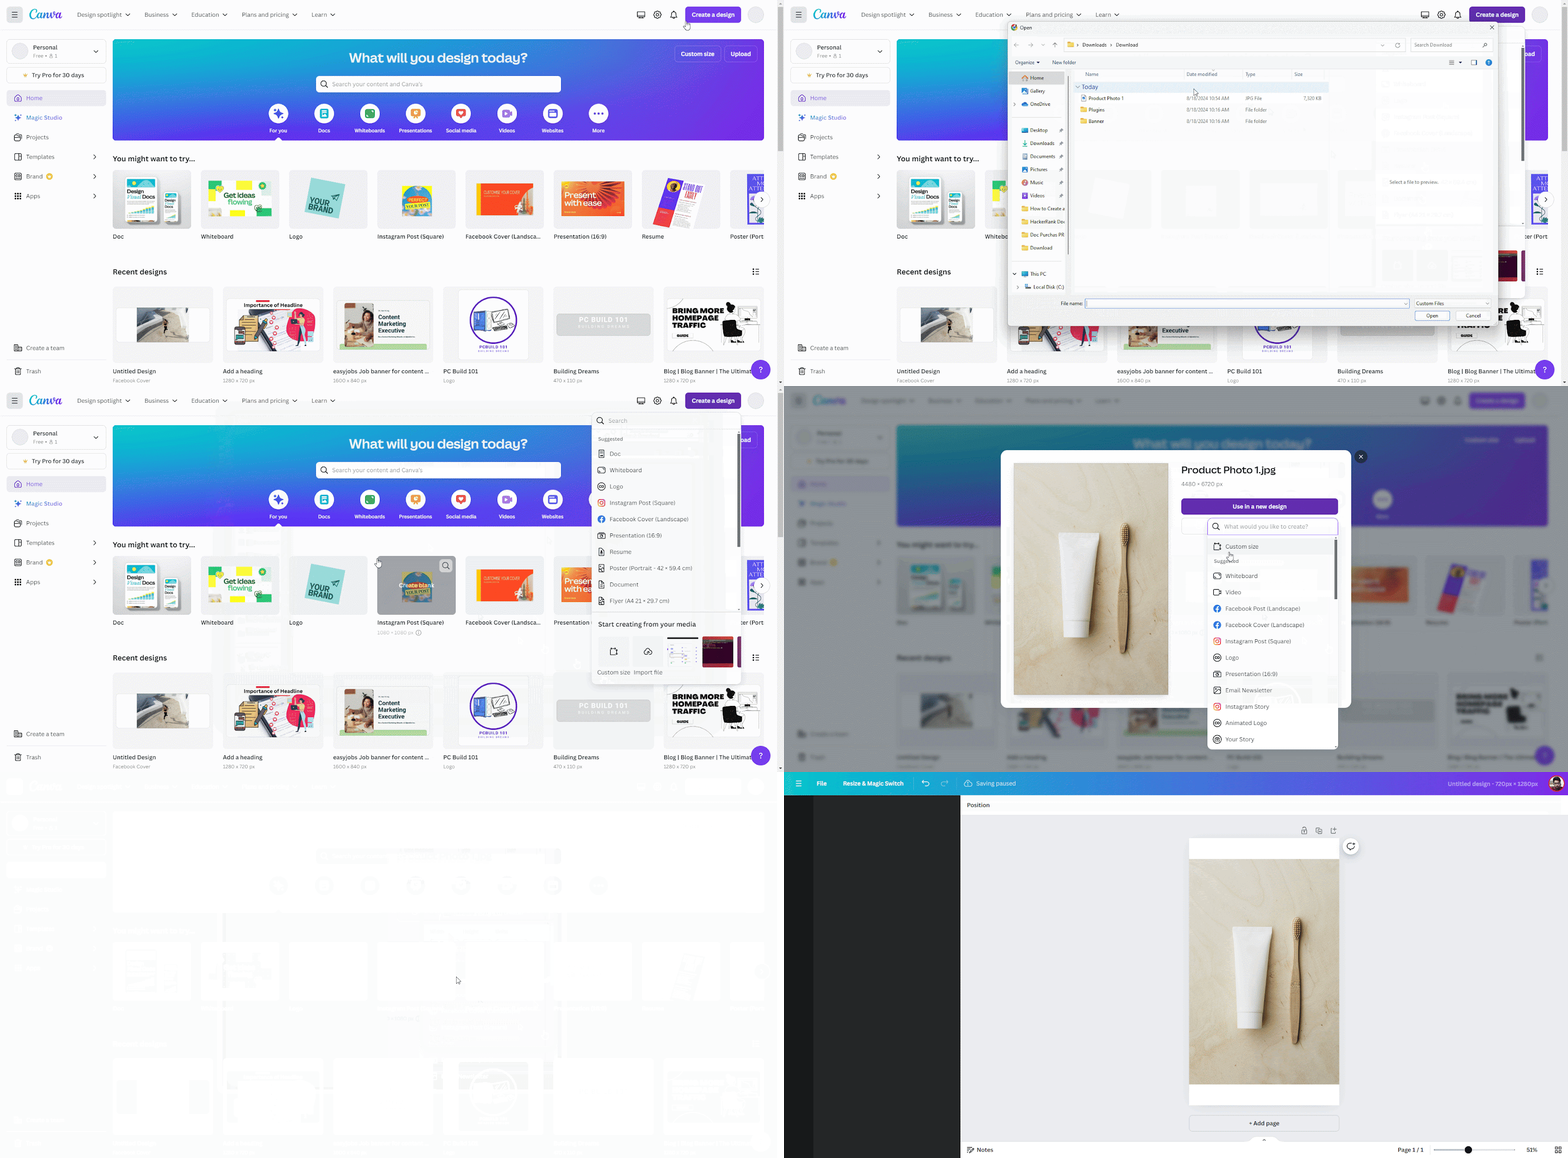
Étape 2 : Exporter le fichier JPEG en tant que fichier réduit
Après avoir téléchargé et ajusté l'image, exportez-la en cliquant sur «Bouton de partage', alors 'Télécharger', et sélectionnez le type de fichier comme JPG format. Réduisez la taille du JPG en faisant glisser la barre sur la section Qualité. Enfin, cliquez sur le bouton «Télécharger' pour enregistrer le fichier de taille réduite sur votre appareil.
Note: Vous aurez besoin Canva Pro pour pouvoir ajuster la qualité dans Canva lors de l'exportation.
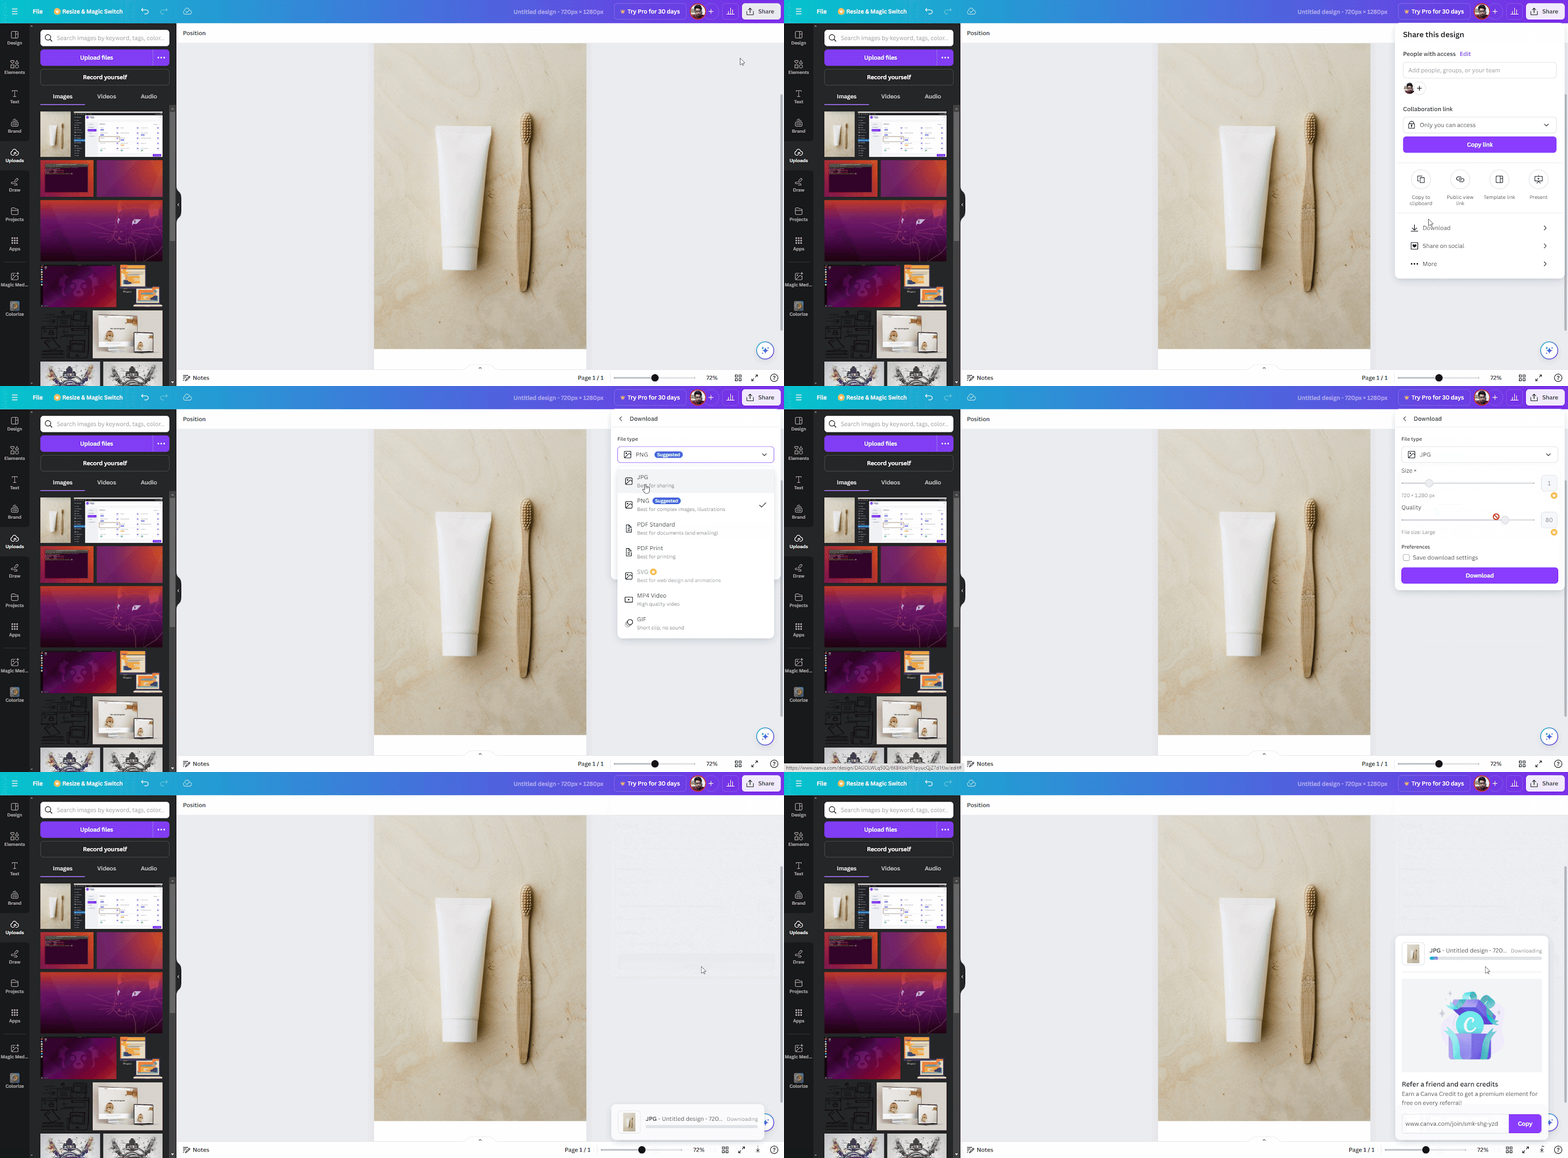
En suivant ces étapes, vous pouvez ajuster la qualité et trouver l’équilibre parfait entre la taille de l’image et son aspect.
Méthode 3 : recadrer l'image pour réduire la taille du fichier JPEG
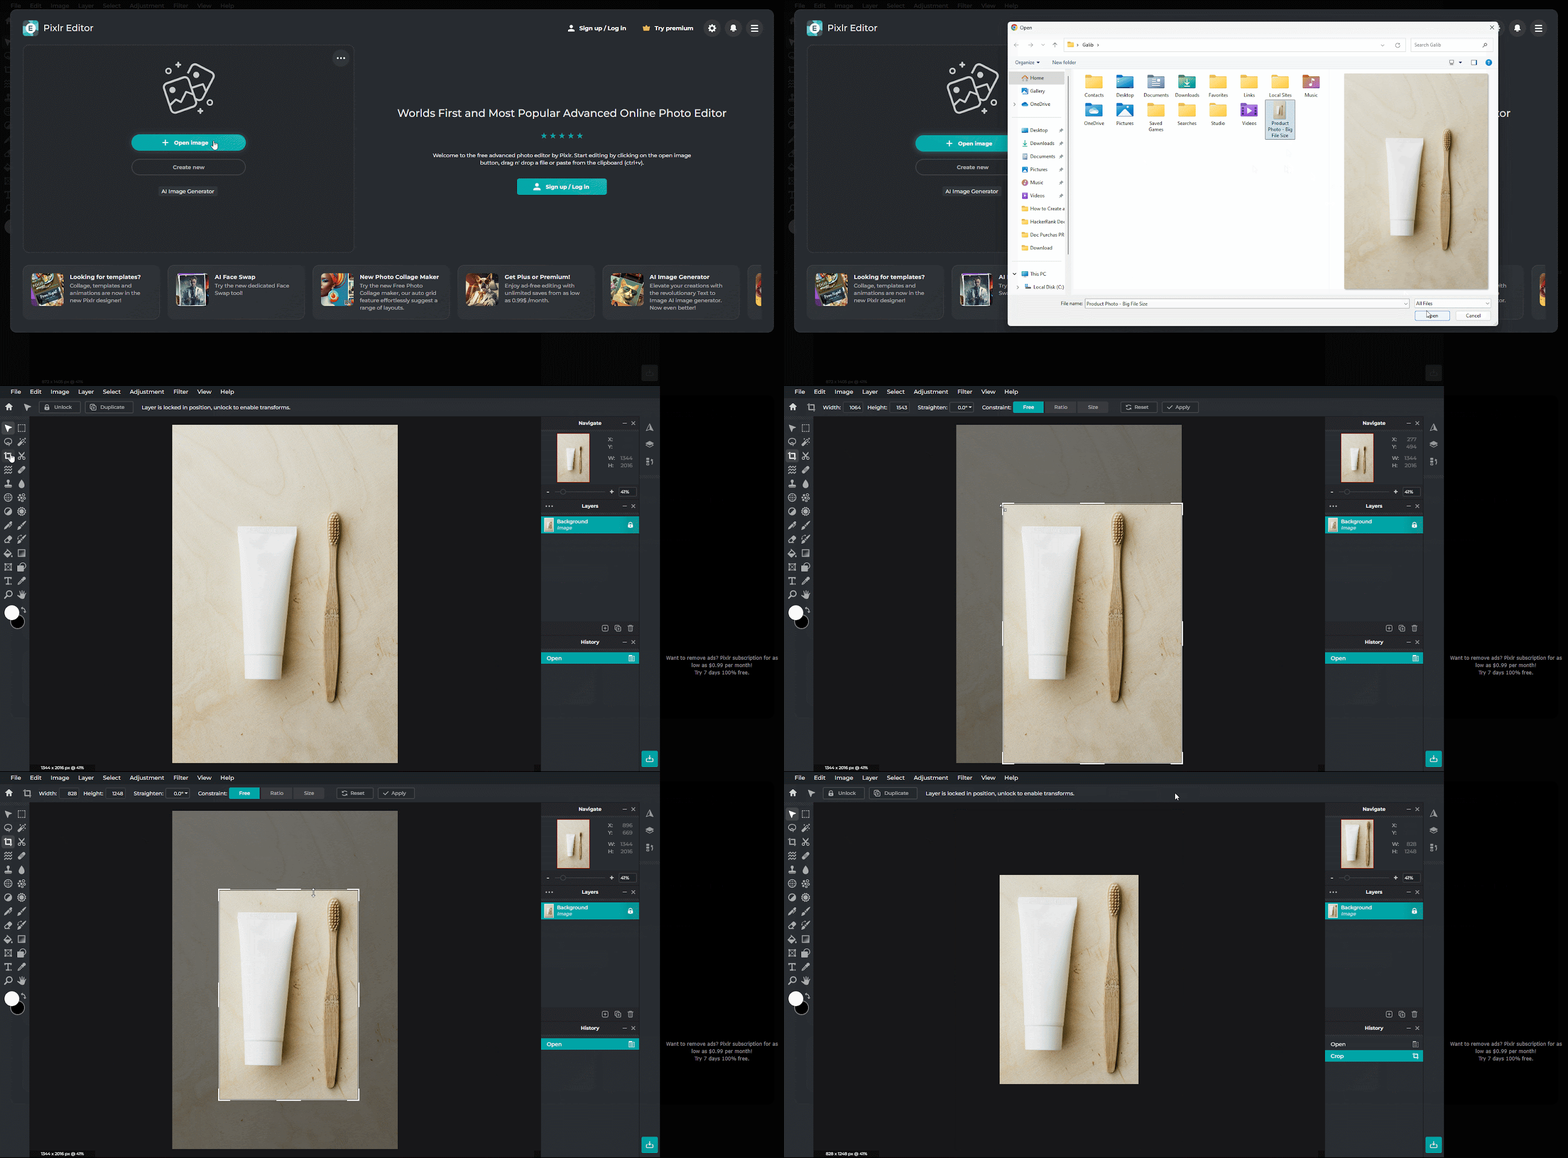
Le recadrage d'une image peut réduire efficacement la taille de son fichier en éliminant les parties inutiles. Cette méthode vous guidera tout au long du processus de recadrage à l'aide de l'outil en ligne gratuit Pixlr Editor.
Étape 1 : Accéder à Pixlr Editor
Depuis votre navigateur, accédez à pixlr.com. Choisir 'Éditeur Pixlr" parmi les options disponibles.
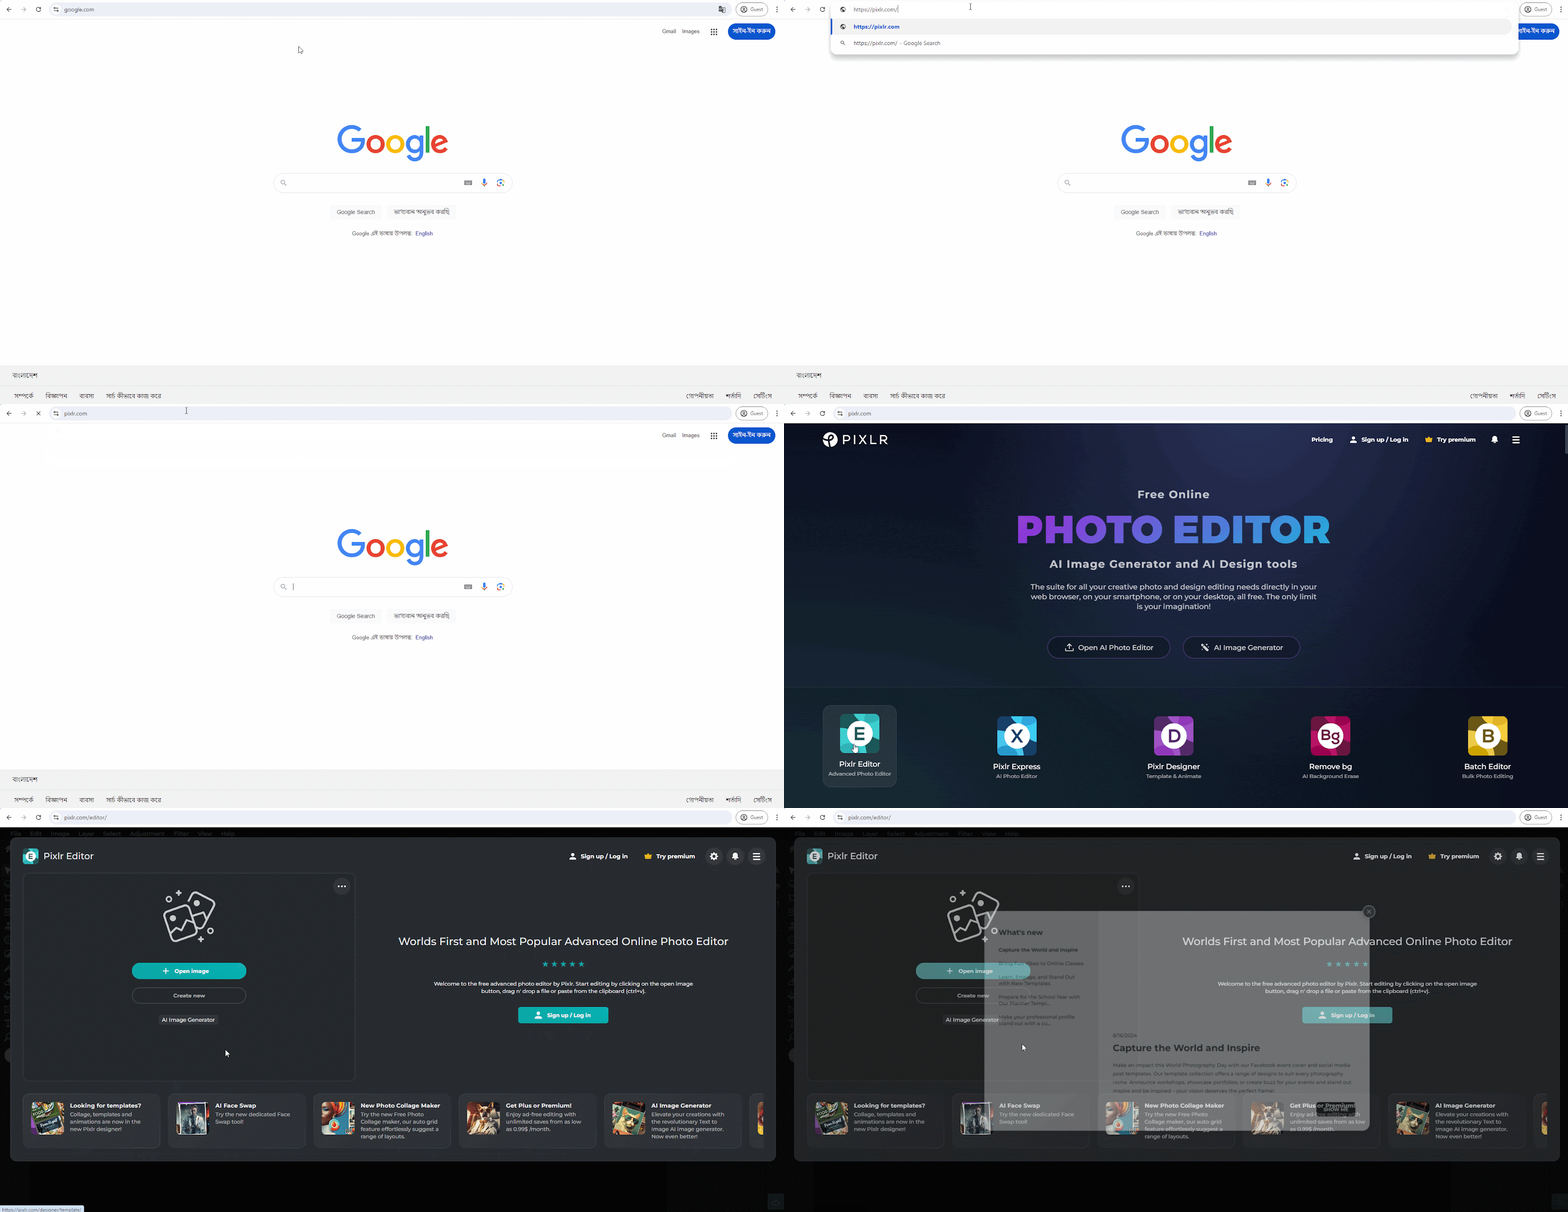
Étape 2 : ouvrez et recadrez votre image
Cliquez sur 'Ouvrir l'image" et sélectionnez l'image que vous souhaitez recadrer à partir de votre ordinateur. Une fois l'image ouverte, sélectionnez le bouton "Recadrer' dans la barre d'outils. Ajustez la zone de recadrage en faisant glisser les poignées autour de l'image. Cliquez sur 'Appliquer" pour confirmer la récolte.
Étape 3 : Enregistrer l’image recadrée
Cliquez sur 'Déposer' et puis 'Enregistrer sous.' Choisir 'JPEG" comme format de fichier et sélectionnez l'emplacement souhaité pour enregistrer l'image recadrée. Cliquez sur "Sauvegarder" pour terminer le processus.
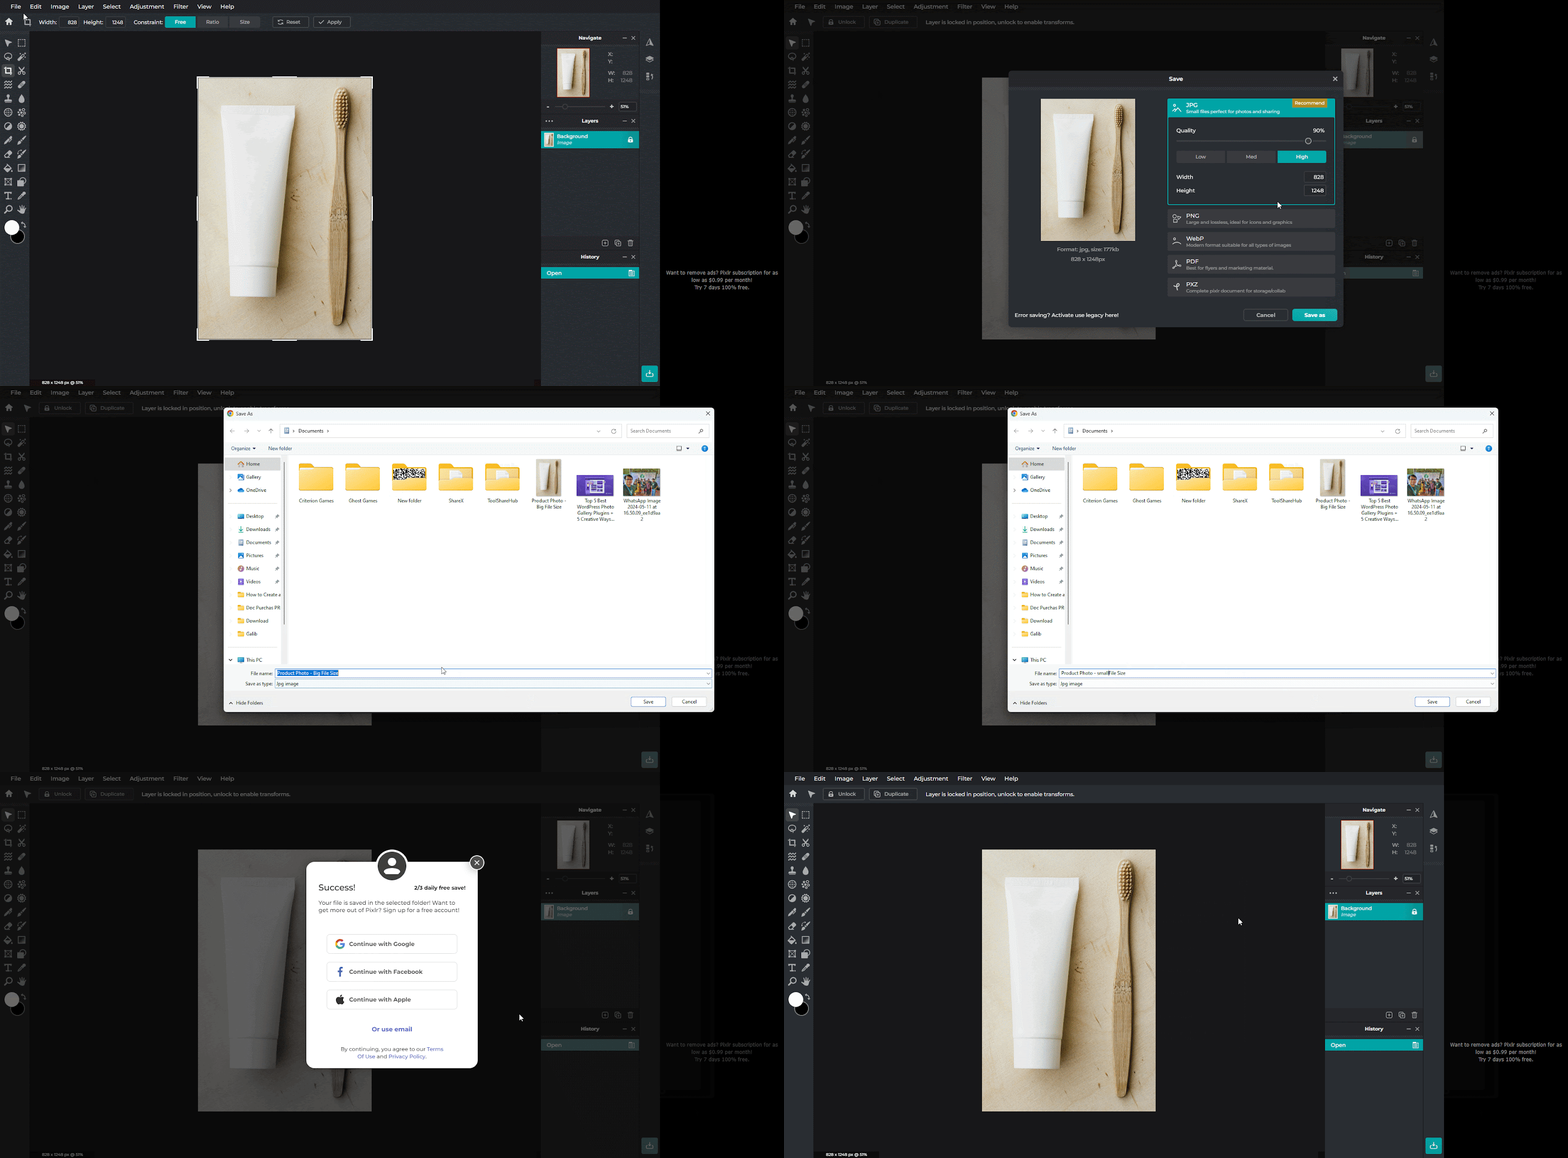
En suivant ces étapes, vous pouvez recadrer avec succès votre image en utilisant Éditeur Pixlr. Le recadrage peut réduire considérablement la taille du fichier, en particulier lorsque vous supprimez de grandes zones de l'image. N'oubliez pas d'expérimenter différents ratios de recadrage pour obtenir le résultat souhaité.
Méthode 4 : Convertir en niveaux de gris pour réduire la taille du fichier JPEG
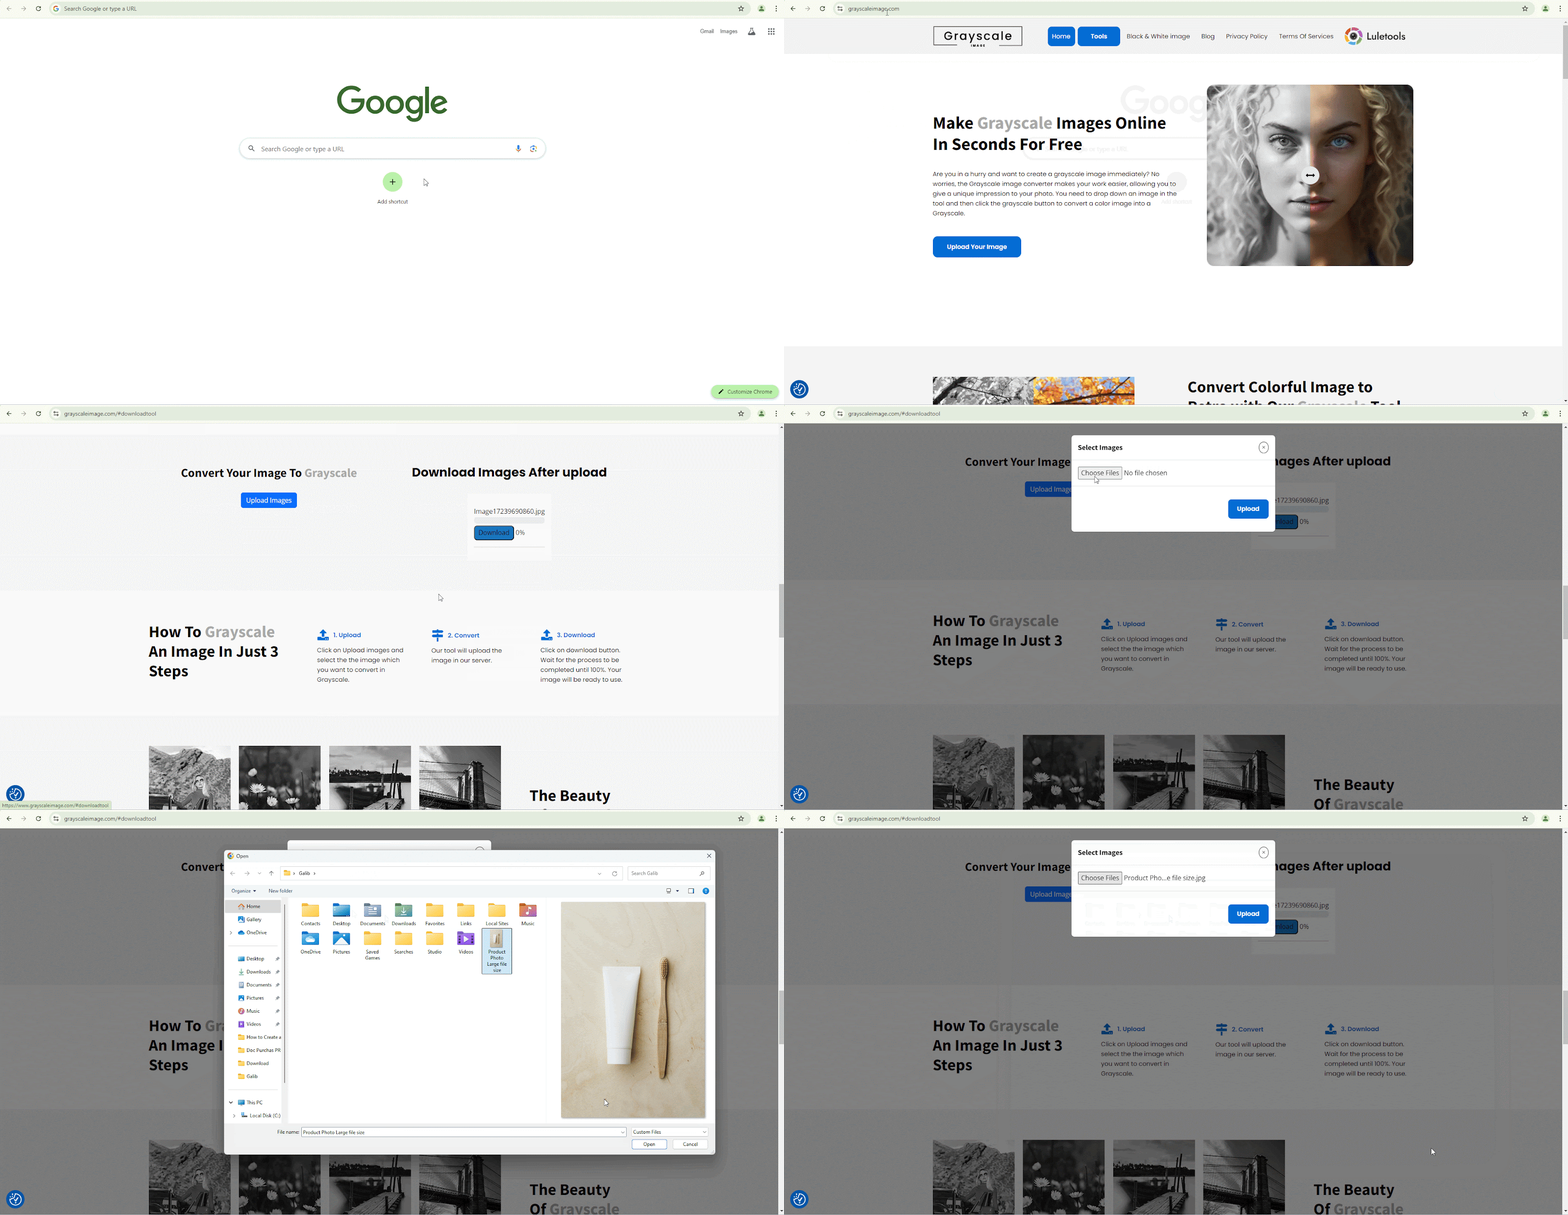
La conversion d'une image en niveaux de gris peut réduire considérablement la taille du fichier, en particulier pour les images aux couleurs limitées. Cette méthode vous guidera tout au long du processus à l'aide de l'outil en ligne Grayscale Image.
Étape 1 : Accédez à l'image en niveaux de gris et téléchargez votre image
Depuis votre navigateur, accédez à grayscaleimage.com Cliquez sur le «Télécharger des images" et puis le "Choisir le fichier' pour sélectionner l'image que vous souhaitez convertir, puis cliquez sur le bouton 'Ouvrir" bouton. Après avoir sélectionné l'image, appuyez sur le bouton "Télécharger' bouton.
Étape 2 : Convertir en niveaux de gris et télécharger l'image en niveaux de gris
Le site Web convertira automatiquement l'image en niveaux de gris. Cliquez sur le bouton «Télécharger' pour enregistrer l'image convertie sur votre ordinateur.
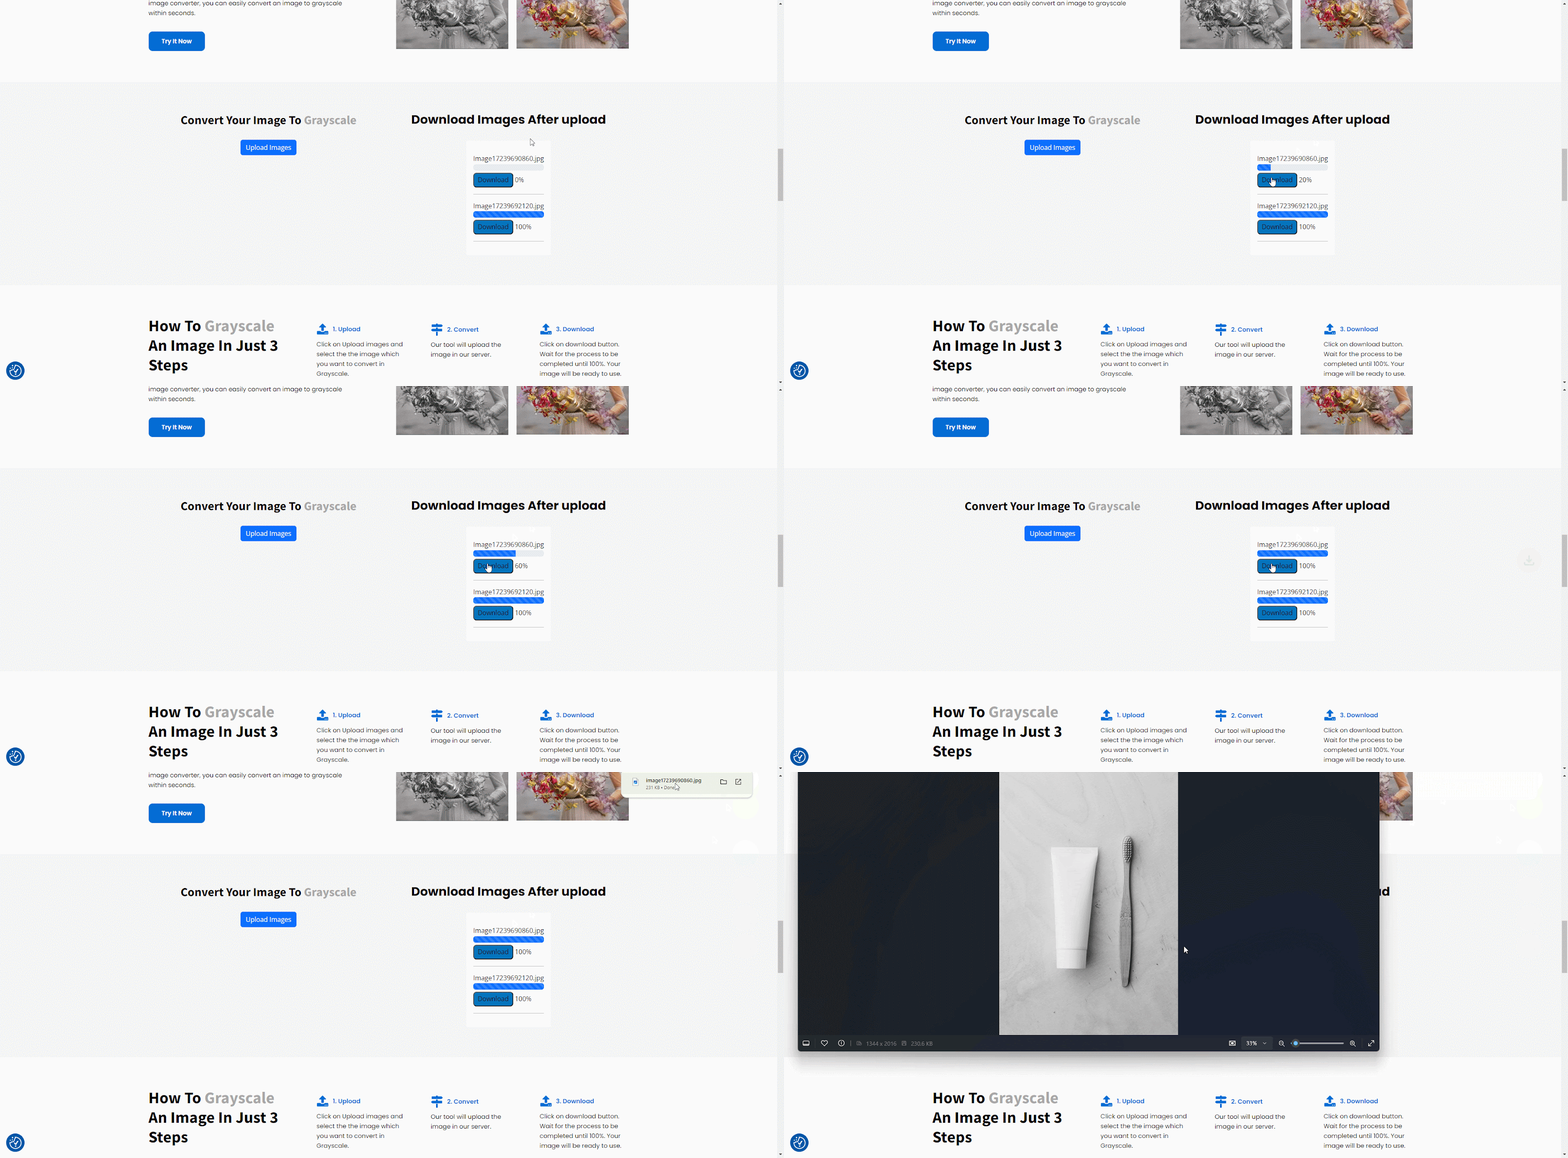
En suivant ces étapes simples, vous avez réussi à convertir votre image en niveaux de gris à l'aide de Grayscale Image. Cette méthode est rapide et facile, et elle peut réduire considérablement la taille du fichier sans nécessiter de compétences avancées en matière d'édition d'images. N'oubliez pas que cette méthode est plus efficace pour les images aux couleurs limitées.
Méthode 5 : Compression automatique des images dans la boutique Shopify
L'optimisation des images est essentielle pour améliorer la vitesse et les performances d'un site Web. StoreSEO est une application Shopify qui simplifie le processus d'optimisation des images. Optimiseur d'image StoreSEO vous permet de personnaliser la manière dont vos images sont optimisées. Pour définir vos paramètres d'optimisation d'image préférés, procédez comme suit :
Étape 1 : Configurer les paramètres par défaut de l'optimiseur d'image
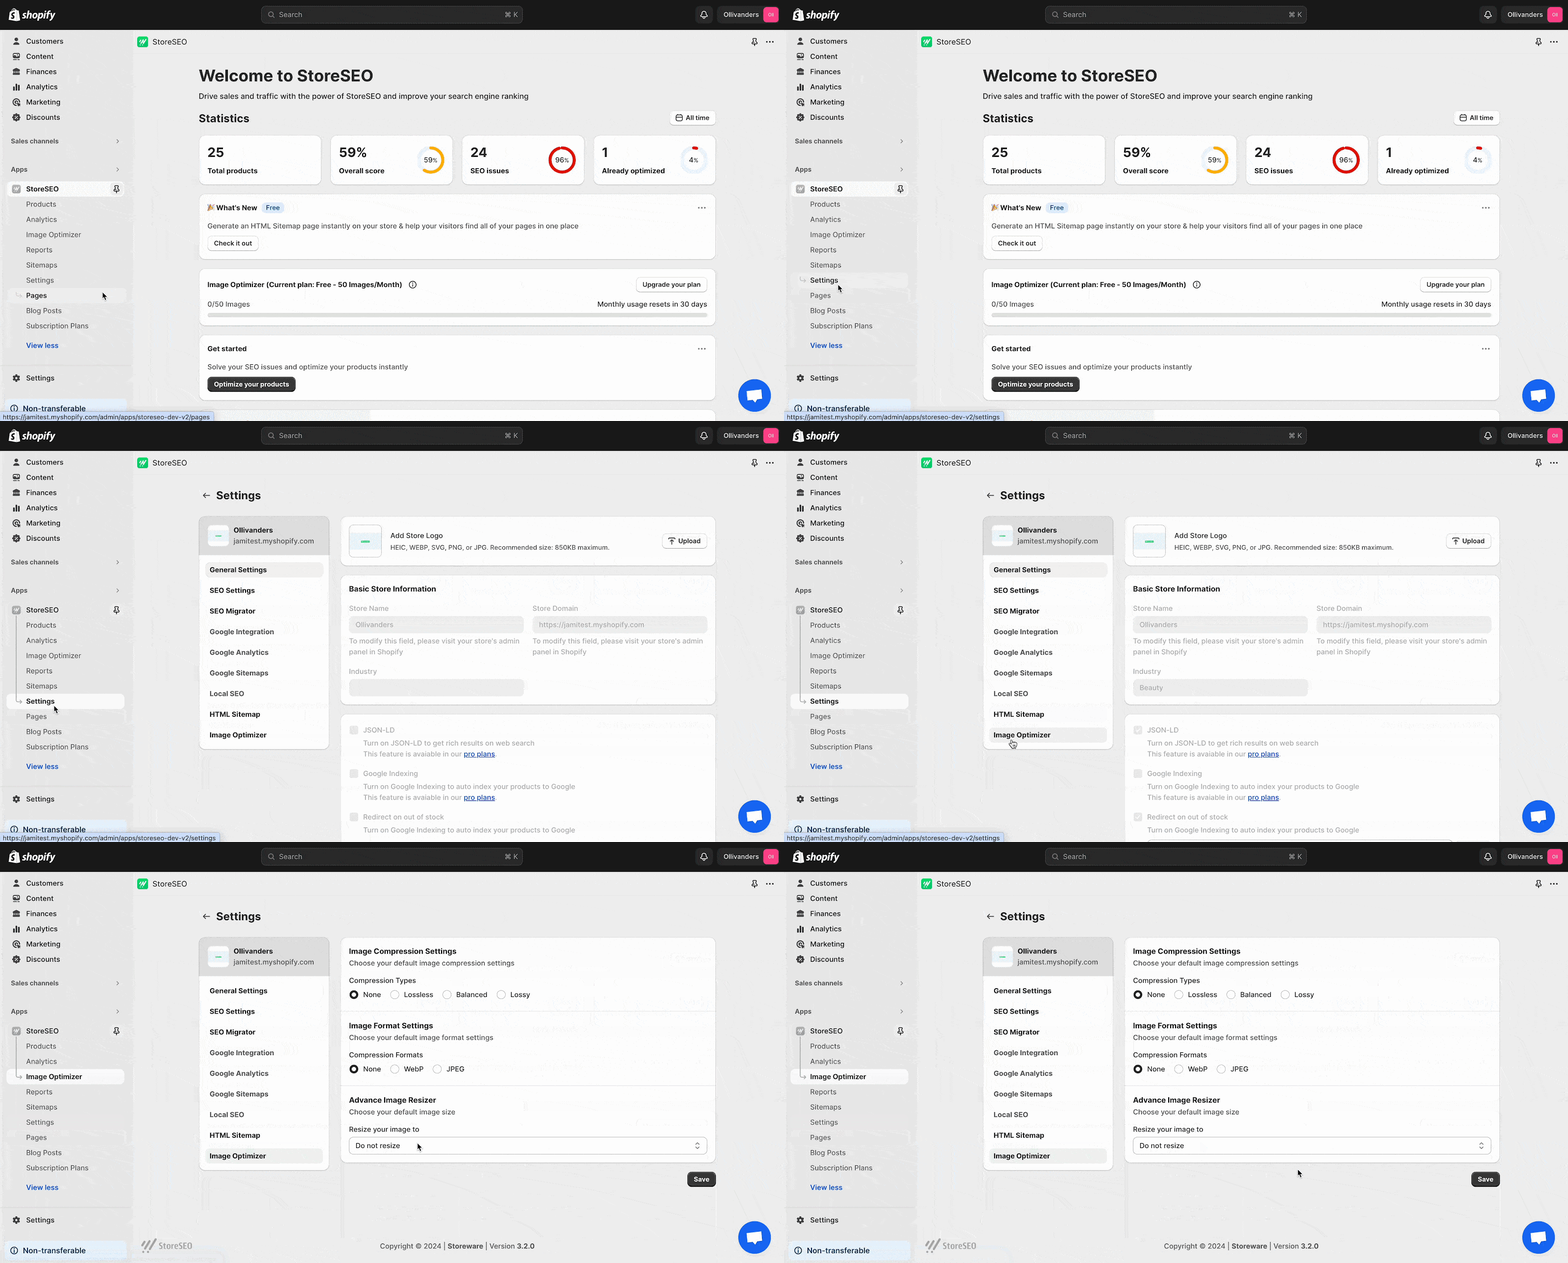
Depuis votre tableau de bord StoreSEO, accédez à «Paramètres' de votre tableau de bord StoreSEO. À partir de là, sélectionnez la section 'Optimiseur d'image' option. Vous retrouverez tous les paramètres disponibles pour configurer vos préférences d'optimisation d'image.
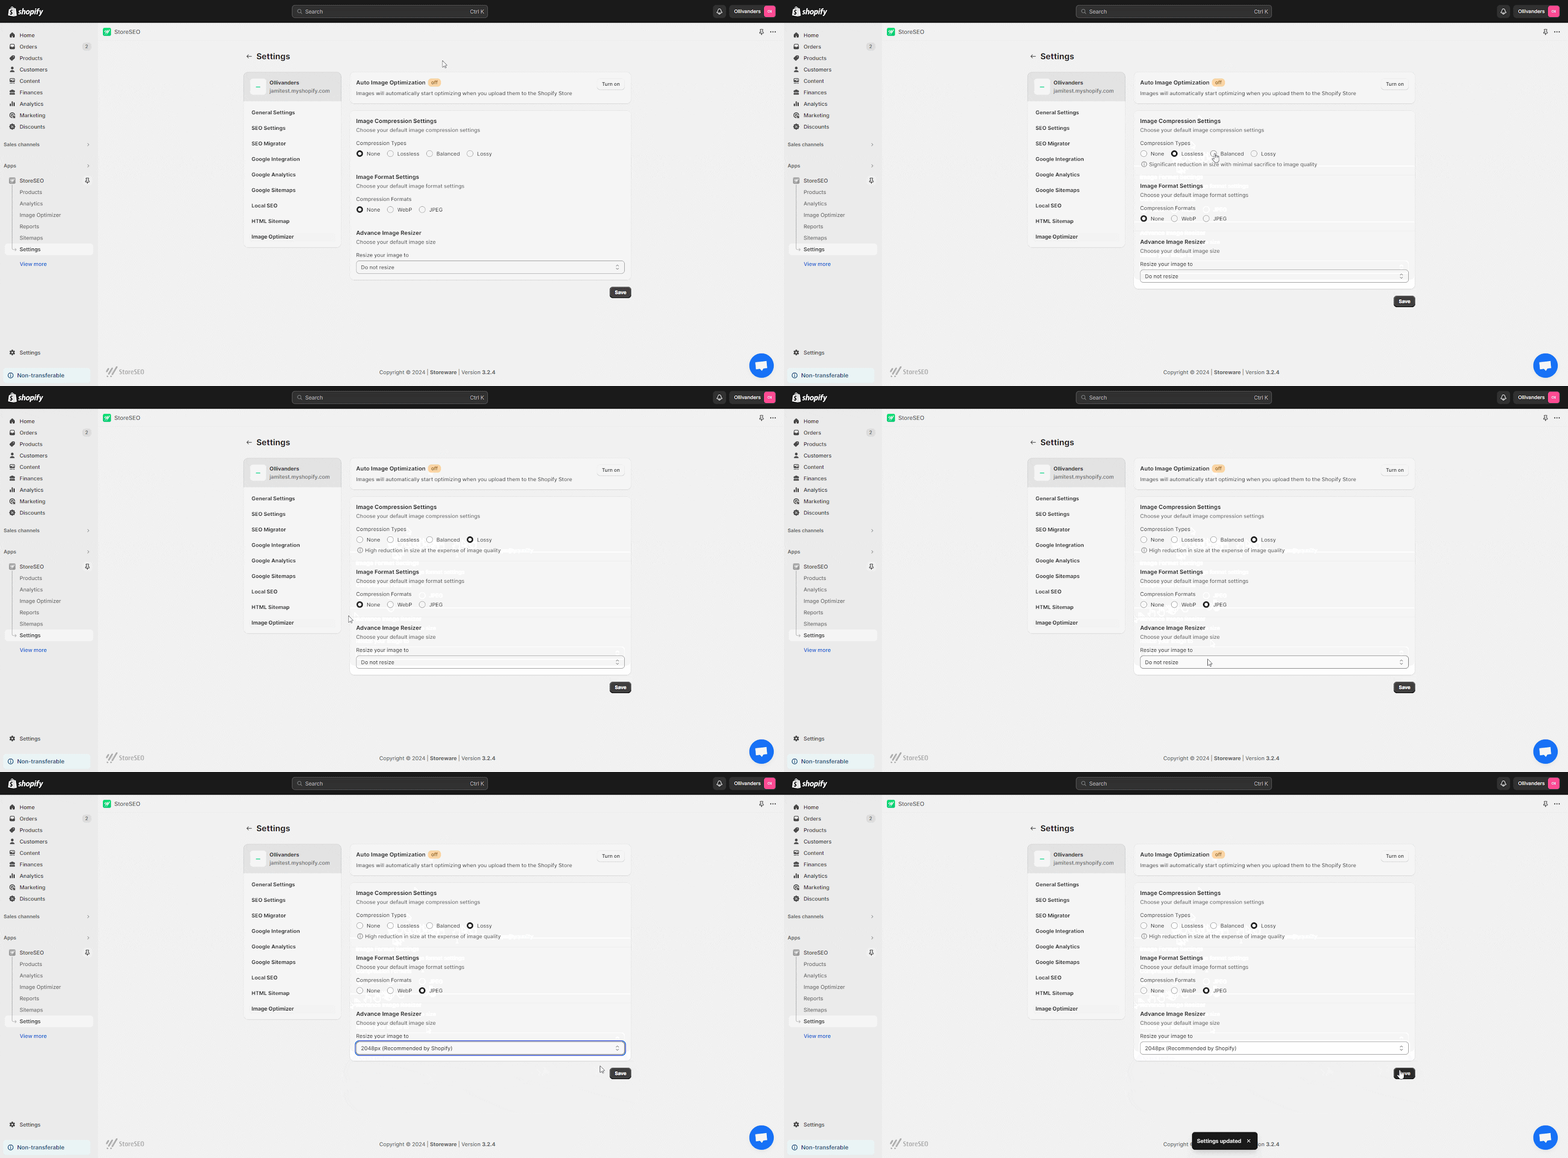
Ensuite, sélectionnez vos paramètres préférés pour la compression d'image, le format d'image et le redimensionnement d'image. Une fois vos choix effectués, cliquez sur le bouton «Sauvegarder' pour appliquer les modifications.
Étape 2 : Accédez à l'onglet « Optimiseur d'image » et optimisez l'image
Pour optimiser une image, allez dans le «Optimiseur d'image' section de votre tableau de bord StoreSEO. Sélectionnez l'image que vous souhaitez améliorer et cliquez sur le bouton 'Optimiser' bouton. L'image sera instantanément améliorée en fonction de vos paramètres d'optimisation précédemment enregistrés.
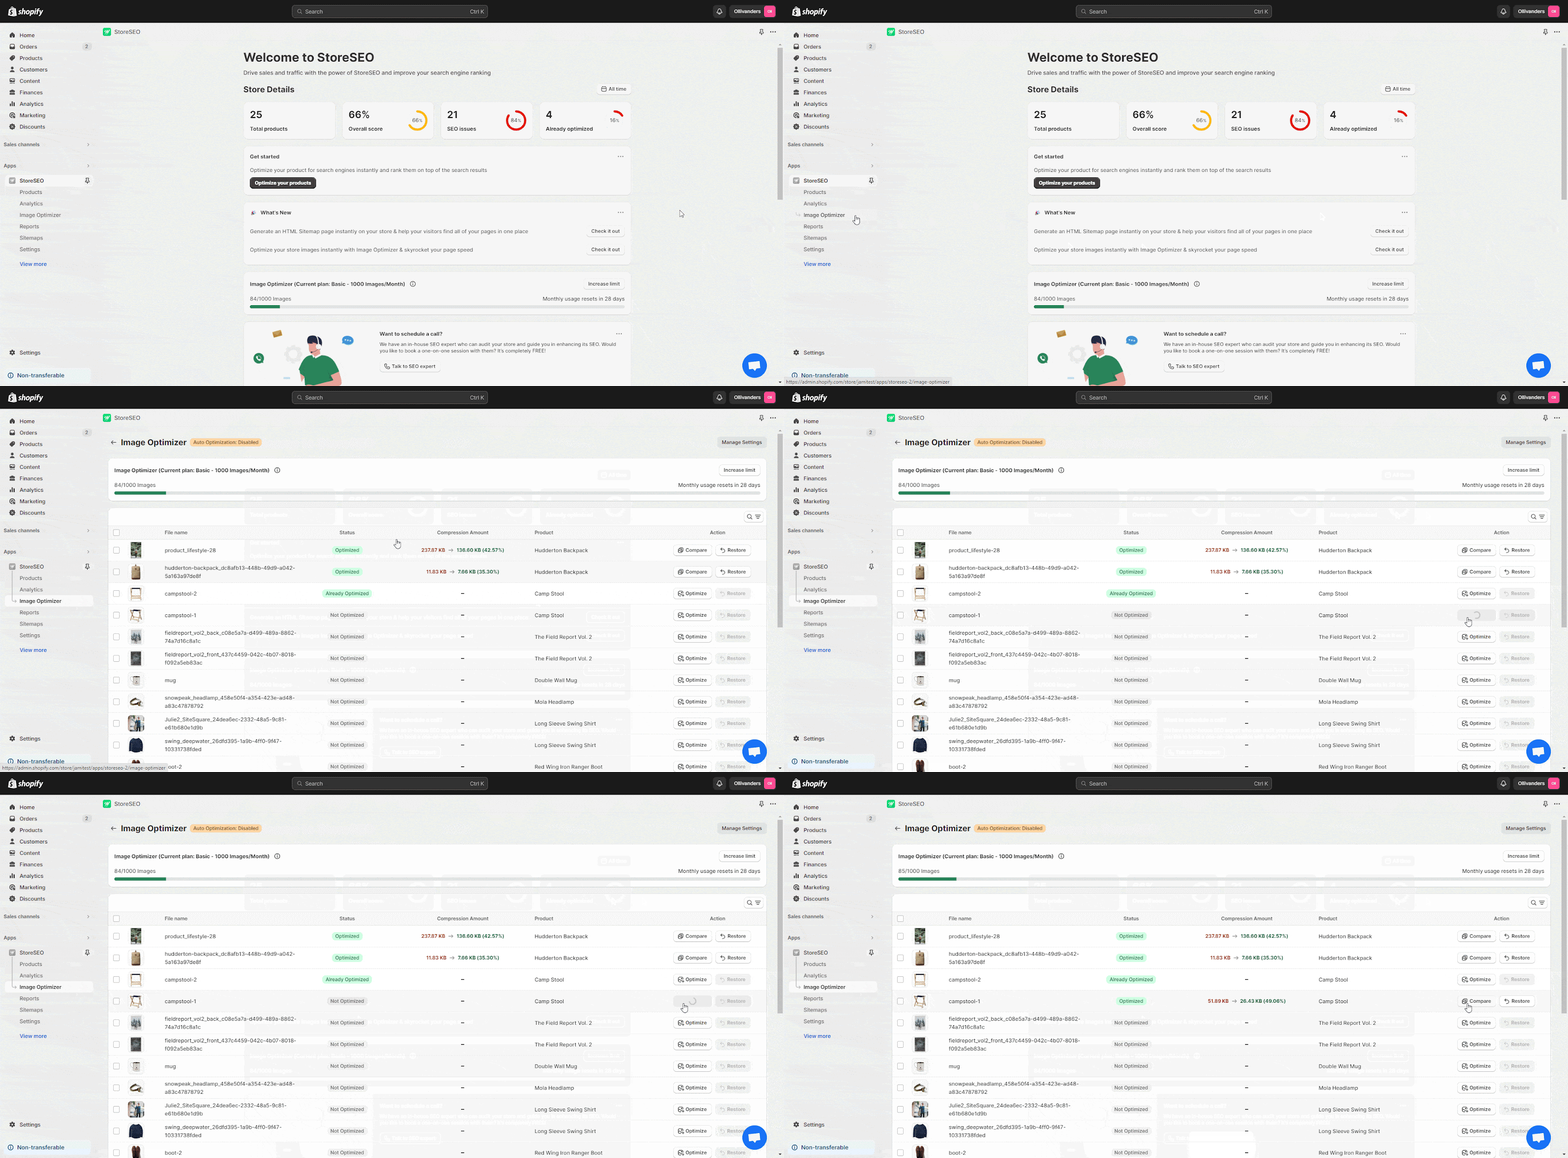
En utilisant Référencement de magasinAvec l'optimiseur d'images de Shopify, vous pouvez réduire efficacement la taille du fichier des images de votre boutique Shopify sans intervention manuelle. Cela peut conduire à des temps de chargement plus rapides, à une expérience utilisateur améliorée et à un meilleur classement dans les moteurs de recherche. N'oubliez pas de choisir le niveau de compression qui correspond le mieux à vos besoins spécifiques en fonction des exigences de qualité de l'image.
Réduisez la taille du fichier JPEG pour un site Web à chargement rapide
La réduction de la taille des fichiers JPEG est essentielle pour accélérer le chargement des sites Web et améliorer l'expérience utilisateur. Ce guide explore cinq méthodes efficaces : le redimensionnement, le réglage de la qualité, le recadrage, l'optimisation pour le Web et l'utilisation d'outils de compression en ligne.
N'oubliez pas que la combinaison de ces techniques donne souvent les meilleurs résultats. Faites des essais pour trouver l'équilibre parfait pour vos images. Pour une optimisation plus poussée, envisagez d'explorer des techniques avancées telles que la conversion JPEG avec perte en JPEG progressif ou l'utilisation d'un logiciel de retouche d'image pour affiner les détails. Si vous avez aimé les suggestions ici et que vous souhaitez en savoir plus sur l'amélioration du site, alors abonnez-vous à notre blog vouloir en savoir plus.


