Möchten Sie Ihr Shopify-Geschäft im Jahr 2024 sicher wachsen lassen? Eine bewährte Methode hierfür besteht darin, aussagekräftige Erkenntnisse zu überwachen, herauszufinden, welche Schlüsselwörter den größten Unterschied machen und woher der Datenverkehr kommt. Aber wie erreichen Sie das alles?
Die Antwort ist einfach – verbinden Sie Ihren Shopify-Shop mit Google Search Console. Sie können nicht nur Effektive Verfolgung aufschlussreicher Daten über Ihren E-Commerce-Shop, sondern können mit den Erkenntnissen auch die richtigen Entscheidungen bezüglich SEO-Optimierungsstrategien für Ihre Produkte und Seiten treffen.

Es gibt zwei einfache Methoden, die Sie befolgen können: Arbeiten Sie mit einer App, die Aufgaben nahtlos erledigt, oder verwenden Sie Shopifys eigenes Theme Liquid. In dieser umfassenden Anleitung zeigen wir Ihnen, wie das geht und warum es für Ihr Unternehmen so wichtig ist. Lassen Sie uns also ohne weitere Umschweife loslegen.
Was ist die Google Search Console?
Google Search Console, früher bekannt als Google Webmaster Tools, ist ein kostenlose Plattform Damit können Sie eine Verbindung zu Ihrer Website herstellen und verfolgen, wie Google sie bewertet.
Die Search Console durchsucht gründlich Ihre verweisenden Domains, die Leistung Ihrer mobilen Website, umfangreiche Suchergebnisse, die Suchanfragen und Seiten mit dem höchsten Datenverkehr und mehr. Daraus ergibt sich dann eine Gesamtbewertung der Leistung Ihrer Website oder Ihres Shops.
Aber warum sollten Sie Ihren Shopify-Shop mit der Google Search Console-Plattform verbinden? Nun, die Antwort ist ganz einfach: um die organische Sichtbarkeit Ihrer Website oder Ihres Shops in Suchergebnissen zu optimieren und die SEO-Werte zu verbessern.
Warum Sie die Google Search Console mit Shopify verbinden sollten: Verstehen Sie die Bedeutung für Ihren Shop
Aber bevor wir uns mit dem gesamten Prozess befassen, wie Sie Ihren Shopify-Shop mit der Google Search Console verbinden können, müssen Sie eine klare Vorstellung davon haben, wie der Prozess funktioniert und welche Vorteile er Ihnen bietet. Um das zu verstehen, müssen wir zunächst einen Blick darauf werfen was eCommerce-Shop-Strukturen und Sitemaps sind und wie wichtig sie sind, um Ihrem Unternehmen zu der richtigen Sichtbarkeit in den Suchmaschinen zu verhelfen.
Verbessern Sie Ihre SEO-Werte durch die Übermittlung von Shop-Strukturen

Ein Geschäft Seitenstruktur beschreibt, wie Informationen auf Ihrer Website präsentiert werden, wo sich die relevanten Inhalte befinden, wie sie gestaltet sind und wie die Seiten miteinander in Beziehung stehen, sodass Ihr Geschäft in den SERPs leichter gefunden werden kann. Und genau das hilft Ihnen dabei, Ihr Unternehmen in den Suchseiten weit oben zu platzieren.
Dies ist von großer Bedeutung für die Optimierung der SEO Ihres Shopify-Shops, da Suchmaschinen wie Google verlässt sich darauf um zu bestimmen, wo sich die qualitativ hochwertigsten Inhalte befinden. Daher ist es ein Schlüsselfaktor bei der Bewertung der Google Search Console, wie Suchmaschinen Ihre Shop-Websites crawlen und bewerten.
Sitemaps übermitteln, organisieren und auf dem neuesten Stand halten

Sobald Sie eine leistungsstarke Struktur für Ihren Shop erstellt haben, besteht der nächste wichtige Schritt darin, Sitemaps für Shopify hinzufügen. Sie können sich Sitemaps als die Blaupause Ihres Shopify-Shops vorstellen. Ähnlich wie Shopstrukturen helfen sie Suchmaschinen wie Google dabei, alle wichtigen Informationen und Inhalte auf der Website Ihres Shops für die SEO zu finden, zu crawlen und zu indizieren.
Wenn potenzielle Käufer Suchanfragen zu Ihren Inhalten oder Produkten stellen, können Suchmaschinen-Crawler dank dieser Art der organisierten Kategorisierung schnell relevante Inhalte identifizieren und die richtigen Informationen abrufen. Diese Sitemaps enthalten auch Informationen darüber, wie aktuell Ihr Shop ist. Diese Informationen berücksichtigen Suchmaschinen bei der Bestimmung des Rankings Ihrer Website auf den Suchergebnisseiten.
Ab sofort liefert die Google Search Console wichtige Informationen zum aktuellen Status deiner eingereichten Sitemaps. Dies hilft dir dabei, deine Sitemaps zu organisieren und möglichst aktuell zu halten.
Überwachung der Site-Leistung
Mithilfe von GSC können Sie auch die Site-Integrität verstehen. Sie können ganz einfach einen vollständigen Überblick über die Gesamtstatistiken und -raten Ihres Shopify-Shops erhalten und sehen, ob Google beim Crawlen auf Probleme gestoßen ist.
Einzelseitenanalyse auf Shopify
Während Sie mit GSC Ihre gesamte Shop-Site problemlos prüfen und überwachen können, erhalten Sie auch die Flexibilität, jede Produktseite einzeln zu analysieren, um zu erkennen, welche Produkte besser laufen und welche verbessert werden müssen.
Beheben von Crawling-Problemen und Verbesserung der Sichtbarkeit Ihres Shopify-Shops
Es analysiert und bestätigt, dass Google die Website Ihres Shops problemlos finden und crawlen kann. Der GSc benachrichtigt Sie auch, wenn Crawling-Probleme vorliegen, um die Sie sich kümmern müssen. GSC hilft auch bei der Behebung von Indexierungsproblemen und bei der Neuindizierung von Anfragen für neue oder aktualisierte Inhalte.
Maximierung der SEO-Wirkung
Die Google Search Console analysiert, wie oft Ihre Website in der Google-Suche angezeigt wird, bei welchen Suchanfragen Ihre Website angezeigt wird, wie oft Suchende bei diesen Suchanfragen zu Ihrer Website durchklicken und vieles mehr. Sie erhalten außerdem einen klaren Bericht darüber, wie gut die Schlüsselwörter und Tags Ihrer Website funktionieren.
Identifizieren Sie SEO-Ranking-Möglichkeiten
In Bezug auf Schlüsselwörter können Sie auch sehen, welche Schlüsselwörter Sie zunächst übersehen haben, aber dennoch nutzen können, um den besten Nutzen zu erzielen. Ähnlich kann Ihnen GSC dabei helfen, andere SEO-Ranking-Möglichkeiten zu finden, die Sie zunächst möglicherweise übersehen haben.
Beheben der Probleme mit der mobilen Benutzerfreundlichkeit
Schließlich können Sie, wie bereits erwähnt, leicht nachvollziehen, wie die mobile Benutzerfreundlichkeit für Ihr Unternehmen funktioniert. Sie können dies befolgen Kurzanleitung zur Behebung alle eventuell auftretenden Probleme.
Aber nicht nur das. Die Google Search Console bietet viele weitere Berichte zu Sicherheitsproblemen, Links, Migrationen, Weiterleitungen, mobiler Benutzerfreundlichkeit, der Behebung verschiedener Probleme und vielem mehr – damit Sie Ihr Unternehmen mühelos auf die nächste Stufe der SERPs bringen können.
Kurz gesagt: Mithilfe der wertvollen Daten, die diese von Google betriebene SEO-Plattform bereitstellt, können Sie Ihren Shop problemlos für ein besseres SEO-Ranking optimieren und datengestützte Entscheidungen über die Darstellung Ihrer Site in Suchmaschinen treffen.
Als Erstes: Fügen Sie Ihren Shop zu GSC hinzu (falls Sie das noch nicht getan haben)
Nachdem Sie eine Site-Struktur und Sitemap für Ihren Shop erstellt haben, müssen Sie Ihren Shop zur Google Search Console (GCS) hinzufügen.
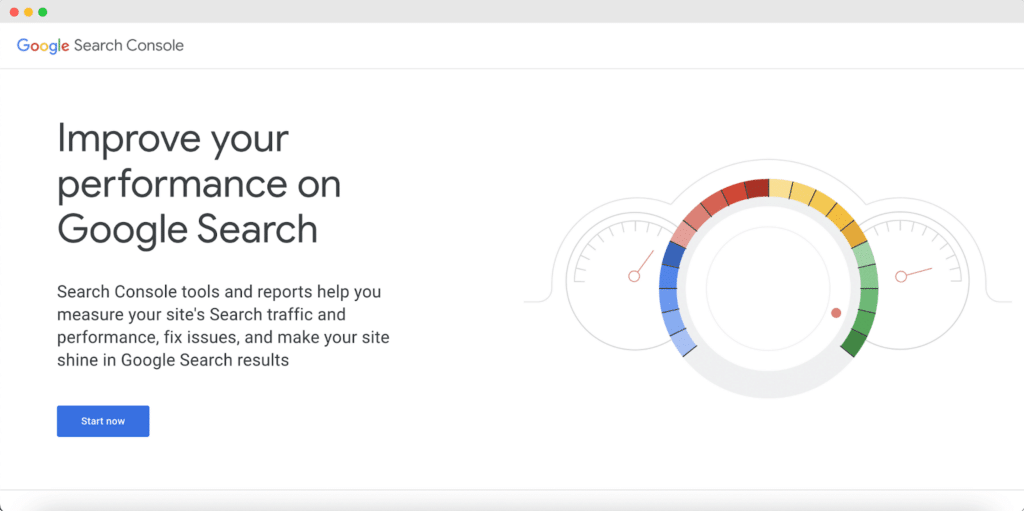
Denken Sie daran, dass Websites (alle Ihre Shop-Seiten, die einen gemeinsamen Domänennamen haben) in GCS normalerweise als Website-Eigenschaft bezeichnet werden. Wenn Sie also zu GCS wechseln, müssen Sie entweder Ihre Eigenschaft hinzufügen oder einfach die Eigenschafts-URLs in die Eingabefelder eingeben, die nach dem Klicken auf das „Jetzt anfangen“ Taste.
Die Datenerfassung für das GSC beginnt sofort, aber Sie müssen noch Ihren Besitz der Immobilie bestätigen – die Schritte sind einfach und werden Ihnen im Laufe der Zeit angezeigt. Und das war’s – Sie haben das GSC erfolgreich für Ihren Shop konfiguriert.
2 Methoden zum Hinzufügen der Google Search Console zu Shopify
In diesem Abschnitt zeigen wir Ihnen zwei Methoden, wie Sie GSC mit Ihrem Shopify-Shop verbinden. Die empfohlene Methode erfolgt halbautomatisch und hilft Ihnen anschließend beim Einreichen Ihrer Sitemap. Die manuelle Methode hingegen kann einen gewissen technischen Aufwand erfordern.
Methode 1: Verwenden der StoreSEO-App (empfohlen)
Für alle, die nach der einfachsten Möglichkeit suchen, ihren Shopify-Shop mit der Google Search Console (GSC) zu verbinden, bieten wir Ihnen StoreSEO – die beste SEO-App, die für ihren Titel bekannt ist 'Entwickelt für Shopify„. Es erfordert keine technischen Kenntnisse und nimmt weniger Zeit in Anspruch als die andere Methode, die wir gleich besprechen werden.
Dieser Vorgang erfordert nur vier schnelle und einfache Schritte. So gehen Sie vor:
Schritt 1: Installieren Sie die StoreSEO Shopify App
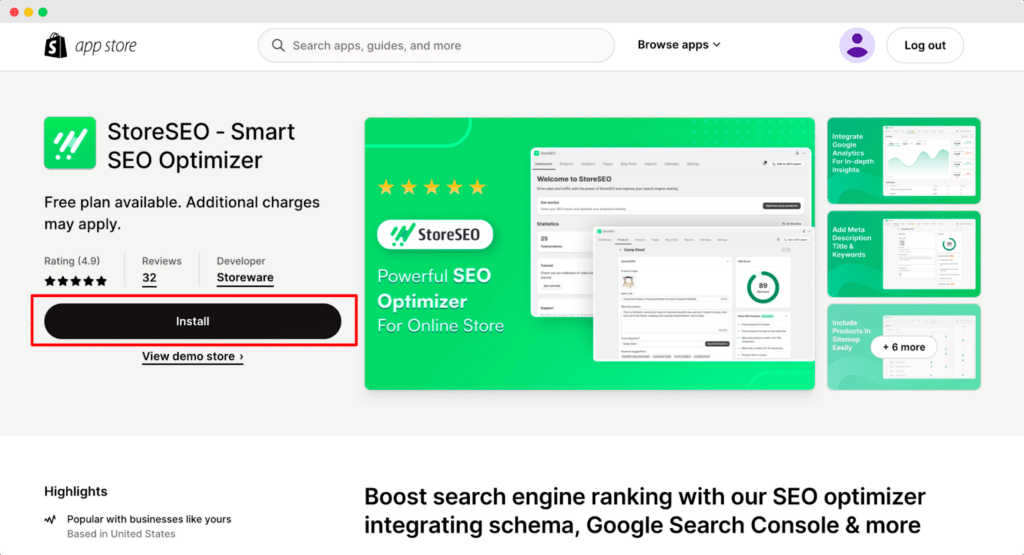
Wenn Sie bereits einen Shopify-Shop eröffnet und eine Produktliste erstellt haben, Installieren Sie die StoreSEO-App. Sie können dies über den Shopify App Store tun oder indem Sie direkt in der Seitenleiste des Dashboards Ihres Stores nach der App suchen.
Schritt 2: Authentifizieren Sie Ihren Shop mit Google
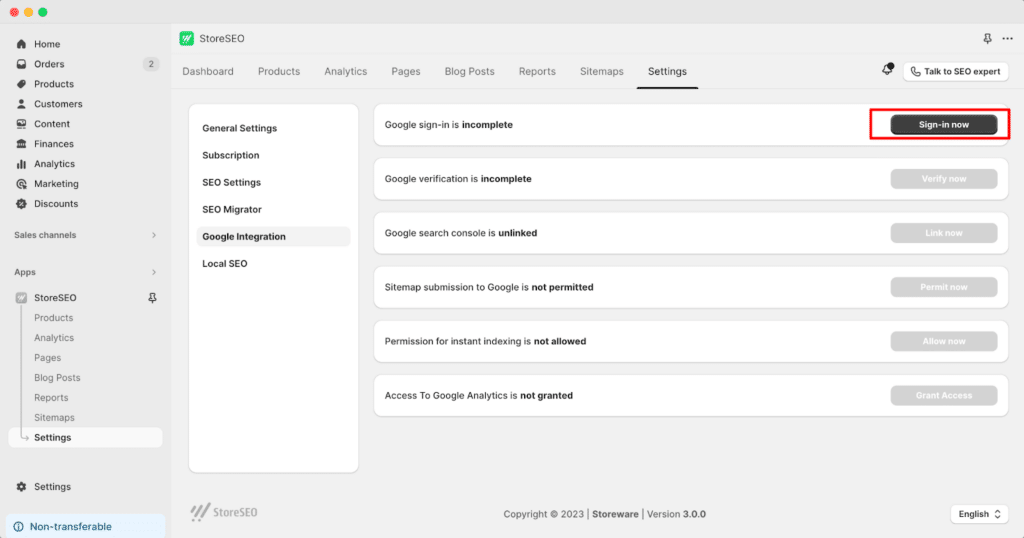
Navigieren Sie dann zum StoreSEO-Einstellungen → Google-Integration Registerkarte. Dort müssen Sie sich bei Ihrem bevorzugten Google-Konto anmelden (dasjenige, das Sie mit dem GSC verbunden und Ihrem Shop bereits hinzugefügt haben). Ein Popup-Fenster wird angezeigt, in dem Sie sich bei Bedarf einfach anmelden können.
Schritt 3: Verifizieren Sie Ihren Shop bei Google
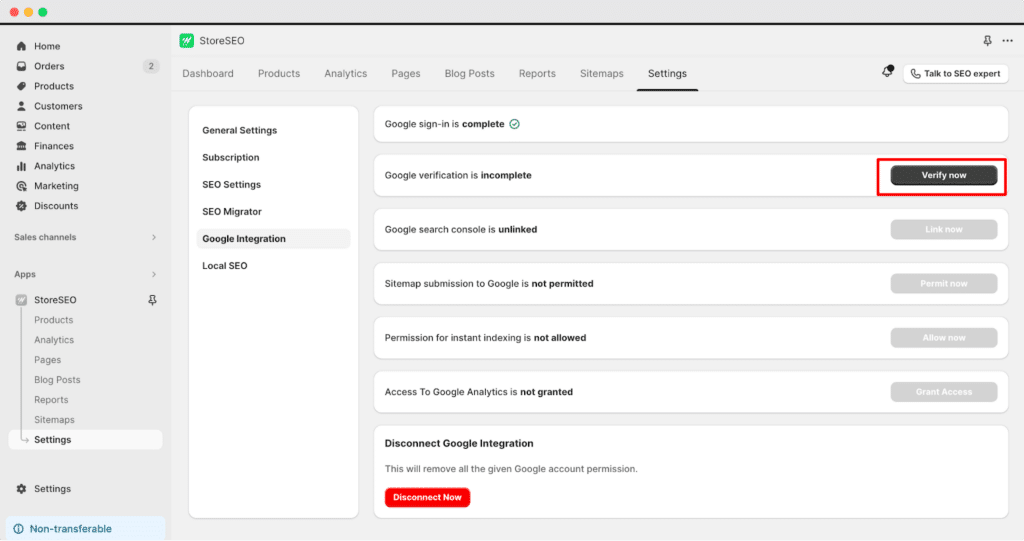
Nach der Anmeldung müssen Sie Ihren Shop oder Ihre Website bei Google verifizieren. Der nächste Schritt auf dem Bildschirm ist der „Jetzt verifizieren“ Klicken Sie einfach darauf und schließen Sie den Authentifizierungsprozess ab.
Schritt 4: Site zur Google Search Console hinzufügen
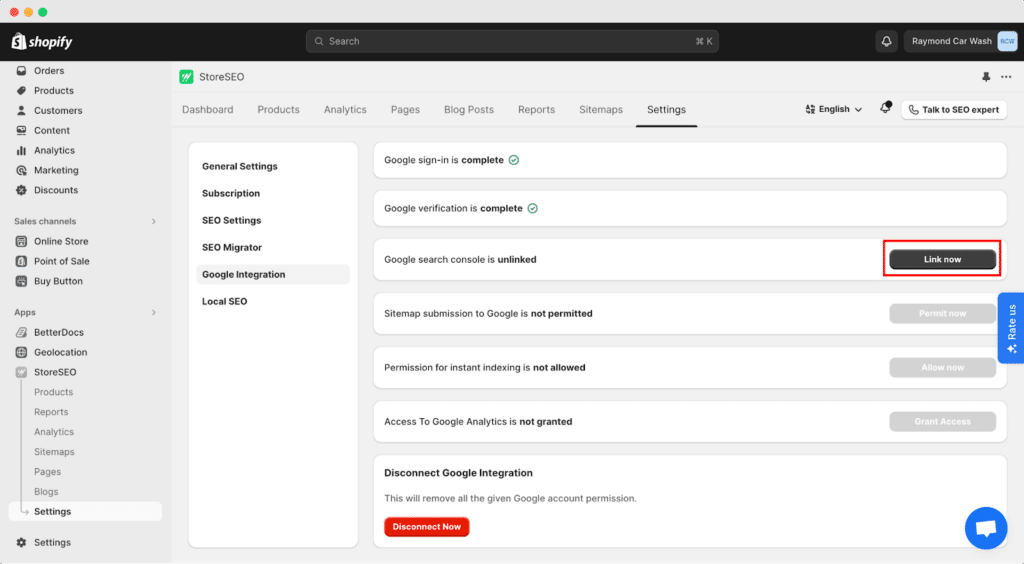
Nachdem Sie Ihre Website bei Google verifiziert haben, können Sie StoreSEO ganz einfach mit der Google Search Console verknüpfen. Auch hier müssen Sie nur auf die Schaltfläche klicken, auf der steht „Jetzt verknüpfen“.
Bonus-Schritt: Erlaubnis zur Einreichung der Google Sitemap
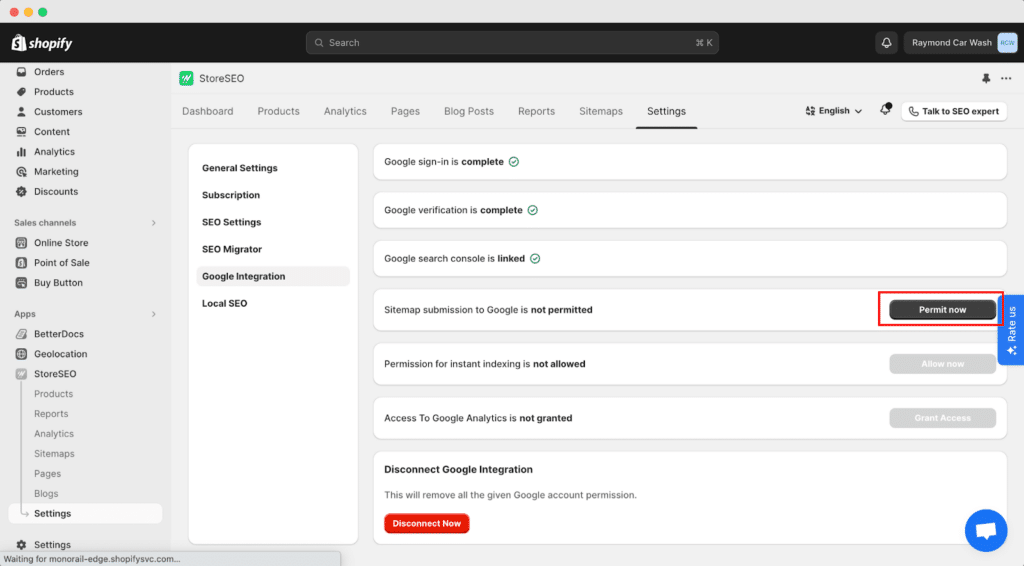
Zum Abschluss müssen Sie die Sitemap Ihres Shopify-Shops bei Google einreichen. Wie Sie bereits wissen, ist dies ebenfalls schnell erledigt. StoreSEO bietet Ihnen eine Schaltfläche „Jetzt genehmigen“, mit der Sie eine Sitemap ganz einfach mit einem einzigen Klick einreichen können.
Und das ist alles. So einfach und ohne Codes können Sie Ihren Shopify-Shop mit StoreSEO mit der Google Search Console verbinden und Ihre Sitemap übermitteln.
Methode 2: Durch Bearbeiten der Datei Theme.liquid
Sie können Ihren Shopify-Shop auch mit Theme.liquid mit GSC verbinden. Auch wenn dieser Vorgang für Benutzer, die sich mit Codierung auskennen, benutzerfreundlicher sein könnte, ist diese Methode auch super einfach.
Schritt 1: Bestätigen Sie den Besitz Ihres Geschäfts (Eigentums) auf GSC
Wie bereits erwähnt, müssen Sie beim Verbinden mit GSC Ihre Site oder Ihren Shop (Ihre Eigenschaft) verifizieren. Dafür gibt es mehrere Möglichkeiten. Die Google Search Console empfiehlt, eine von ihr bereitgestellte HTML-Datei in Ihren Shop hochzuladen. Sie können aber auch HTML-Tags, Google Analytics oder Tag Manager verwenden, um nur einige zu nennen.
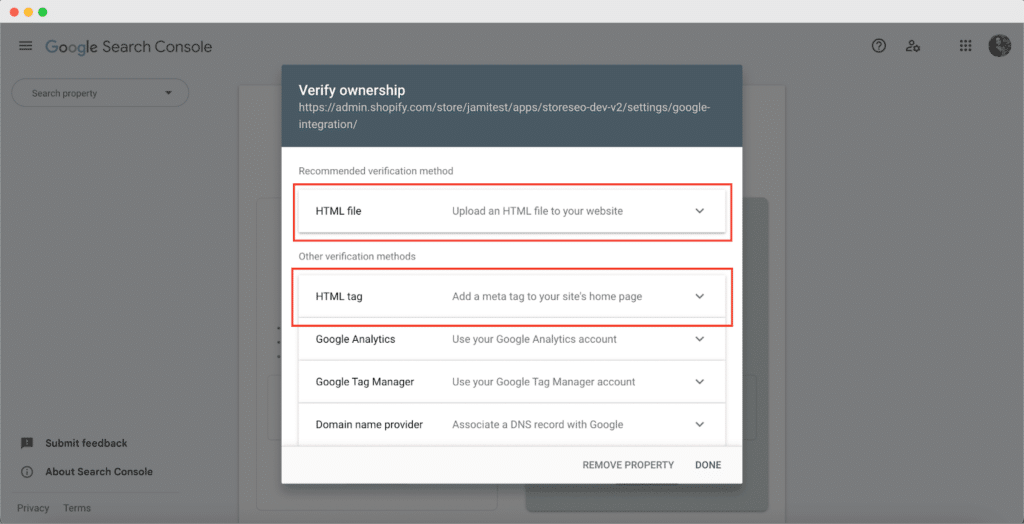
Für dieses Tutorial verwenden wir das HTML-Tag – die zweite Option der Google Search Console.
Schritt 2: Suchen Sie die Einstellungen zum Bearbeiten des Designs auf Shopify
Als Nächstes müssen Sie wissen, wo Sie das HTML-Tag hinzufügen müssen. Dazu müssen Sie das Shopify-Shop-Design bearbeiten.
Navigieren Sie in der Seitenleiste Ihres Shops zur Option „Vertriebskanal“. Ein Dropdown-Menü wird angezeigt, in dem die erste Option oder „Installierter Vertriebskanal“ „Online-Shop“ lautet. Klicken Sie darauf. Sie werden dann auf die Themenseite Ihres Shops weitergeleitet.
Klicken Sie hier auf die Option mit den drei Punkten neben der Schaltfläche „Anpassen“ und gehen Sie zur Option „Code bearbeiten“, wie unten gezeigt.
Schritt 3: Fügen Sie das Tag zur Datei Theme.liquid hinzu
Als nächstes müssen Sie das HTML-Tag hinzufügen, das Sie aus der Google Search Console abgerufen haben. Es erscheint ein neues Fenster, in dem Sie Ihr vorhandenes Shop-Design bearbeiten können. Navigieren Sie zur Seitenleiste ' theme.liquid‘ und fügen Sie Ihren Code einfach zum Editor hinzu.
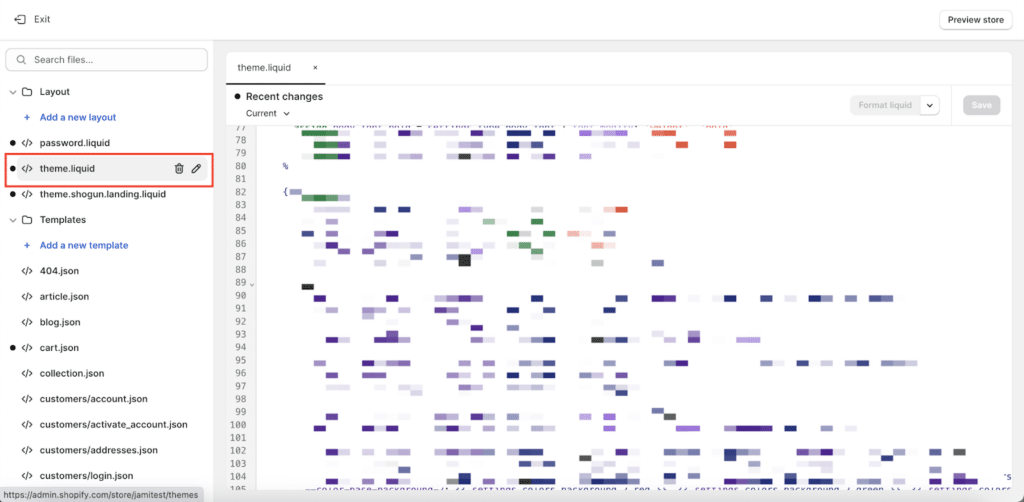
Aber ein kurzer Tipp – bevor Sie irgendetwas davon tun, vergessen Sie nicht, Ihr Design und alle seine aktuellen Einstellungen zu sichern, damit Sie im Notfall besser vorsorgen und sicherer zurückkehren können.
Schritt 4: Änderungen speichern und GSC prüfen
Sobald die Änderungen vorgenommen wurden, klicken Sie oben rechts im Editor auf die Schaltfläche „Speichern“. Und das war’s. Jetzt ist es an der Zeit, zu GSC zu gehen und zu prüfen, ob Ihr Shop erfolgreich mit der Google Search Console verbunden wurde oder nicht.
Schritt 5: Sitemap suchen und zur Google Search Console hinzufügen
Aber wir sind erst fertig, wenn Sie für optimale Ergebnisse auch die Sitemap Ihres Shops zur Google Search Console hinzugefügt haben. Klicken Sie dazu im Abschnitt „Indizierung“ auf „Sitemaps“, geben Sie die URL Ihrer Domain ein und klicken Sie einfach auf „Senden“.
Was passiert als Nächstes, wenn Ihre Search Console mit Shopify verbunden ist?
Unabhängig davon, welche Methode Sie oben auswählen: Wenn Sie die oben genannten Schritte korrekt befolgt haben, haben Sie Ihren Shopify-Shop bereits erfolgreich mit der Google Search Console (GSC) verbunden. Herzlichen Glückwunsch!
Aber Ihr Weg zu besseren SEO-Ergebnissen und einem besseren Verständnis der Leistung Ihres Shops endet hier noch nicht. Werfen wir einen Blick auf die Folgeschritte, die Sie anschließend durchführen müssen.
Ändern der internationalen Targeting-Einstellungen
Sie können zwar immer Ihr lokales Publikum ansprechen, aber es besteht immer eine viel größere Chance, Ihr Geschäft auszubauen und mehr Sichtbarkeit zu erlangen, wenn Sie auch internationale Märkte ansprechen. Dazu müssen Sie jedoch die Einstellungen für die internationale Marktausrichtung für Ihren Shopify-Shop ändern. Die Schritte dazu finden Sie ganz einfach hier ausführliche Anleitung von Shopify selbst, sowohl für Anfänger als auch für erfahrene Unternehmer geschrieben.
GSC mit Google Analytics 4 verbinden
Um noch besser zu verstehen, wie gut Ihr Shop funktioniert, und um detailliertere Daten zu verfolgen, verbinden Sie Ihre Google Search Console mit Google Analytics 4. Dazu sind nur 4 einfache Schritte erforderlich, oder sogar noch weniger, wenn Sie bereits ein Google Analytics-Konto für sich selbst erstellt haben. Erfahren Sie mehr hier ausführliche Anleitung.

Überprüfen Sie ständig die Leistung
Erstellen Sie einen Wochenplan (oder einen Plan zu Ihrem bevorzugten Zeitpunkt), um die Leistung Ihres Shops kontinuierlich zu überwachen und zu prüfen, welche Aspekte für mehr Verkehr und Sichtbarkeit sorgen. Sammeln Sie die erforderlichen Daten sowohl aus der Google Search Console als auch aus Google Analytics und analysieren Sie sie, um Ihre SEO-Strategien zu verbessern.
Übersicht Mobile Sichtbarkeit
Bedenken Sie, dass für die meisten Kunden und Ladenbesucher heutzutage Geräte wie Mobiltelefone an erster Stelle stehen, da jeder von überall und zu jeder Zeit einkaufen möchte. Daher ist es wichtig, dass Sie Ihre Website/Ihren Laden auch für die mobile Sichtbarkeit optimieren. Wenn Sie wissen möchten, ob Ihr Shopify-Shop auf mobilen Bildschirmen gut funktioniert, befolgen Sie die beschriebenen Schritte in diesem Handbuch.
Saisonalität analysieren
Sobald Sie genügend Verkehr auf Ihrer Shopify-Website haben, können Sie Daten aus Ihrem GSC-Konto verwenden, um zu verstehen, wann Ihre Kunden oder Ladenbesucher am aktivsten sind und am wahrscheinlichsten einen Kauf tätigen. Auf diese Weise können Sie besser erkennen, auf welche Anlässe und Jahreszeiten Sie Ihre Marketingbemühungen konzentrieren sollten, und entsprechende Kampagnen erstellen.
Kannibalisierungsprobleme
Und schließlich kann Ihnen die Verbindung Ihres Shops mit dem GSC auch dabei helfen, die Leistung Ihrer Keywords zu verstehen. So können Sie Kannibalisierungsprobleme erkennen und lösen, falls welche vorhanden sind, und die notwendigen Schritte unternehmen, um sie zu verhindern, da sie sonst die Leistung Ihres Shops in den Suchmaschinen beeinträchtigen könnten.
Bonus-Tipp 1: Finden Sie Seiten mit schlechter Leistung mit GSC
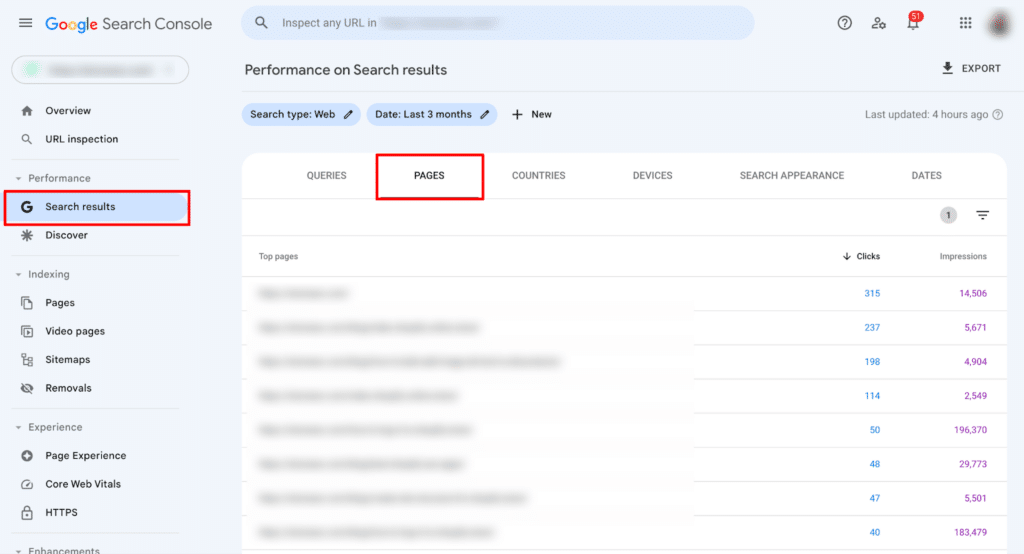
Jetzt, da Sie die Leistung Ihres Shops verfolgen, stellt sich die Frage: Wie finden Sie Seiten, die unterdurchschnittlich abschneiden? Mit GSC ist das ganz einfach. In der Seitenleiste finden Sie eine Option namens 'Suchergebnisse'Navigieren Sie zum 'Seiten' Tab hier und filtern Sie mit „Top-Seiten“. Dadurch können Sie feststellen, welche Seiten und Inhalte mehr Aufmerksamkeit erfordern und verbessert werden müssen.
Bonus-Tipp 2: Häufige Probleme von Shopify zu GSC mit Lösungen
Und damit sind wir fast am Ende unseres vollständigen Leitfadens angelangt. Dieser Leitfaden wäre jedoch nicht vollständig, wenn wir Sie nicht darüber informieren würden, auf welche häufigen Fehler Sie achten sollten.
Aktualisieren oder Ändern des Shopify-Designs
Sie wissen jetzt bereits, wie Sie Ihr Shopify-Design anpassen. Wir haben dies bereits getan, als wir in Methode 2 oben das HTML-Tag zur Datei theme.liquid hinzugefügt haben. Aber manchmal läuft Ihr Update (manuell oder automatisch) nicht reibungslos. Versuchen Sie das Update erneut oder wenden Sie sich an den Shopify-Support.
Sie haben die falsche URL Ihrer Shopify-Eigenschaft bestätigt
Wenn Sie mehrere Onlineshops betreiben, kann es passieren, dass Sie die falsche URL Ihres Shopify-Angebots verifizieren. Gehen Sie einfach zurück zu GSC, entfernen Sie die falsche URL und befolgen Sie die Schritte zur Authentifizierung der richtigen URL.
Wenn Sie zu viele Eigenschaften in Ihrem CGS-Konto haben, können Sie auch versehentlich HTML-Tags oder Dateien von der falschen Eigenschaft abrufen. Folgen Sie einfach der oben genannten Methode 2 und verbinden Sie Ihren Shopify-Shop erneut mit der Google Search Console.
Überwachen von Indizierungsproblemen
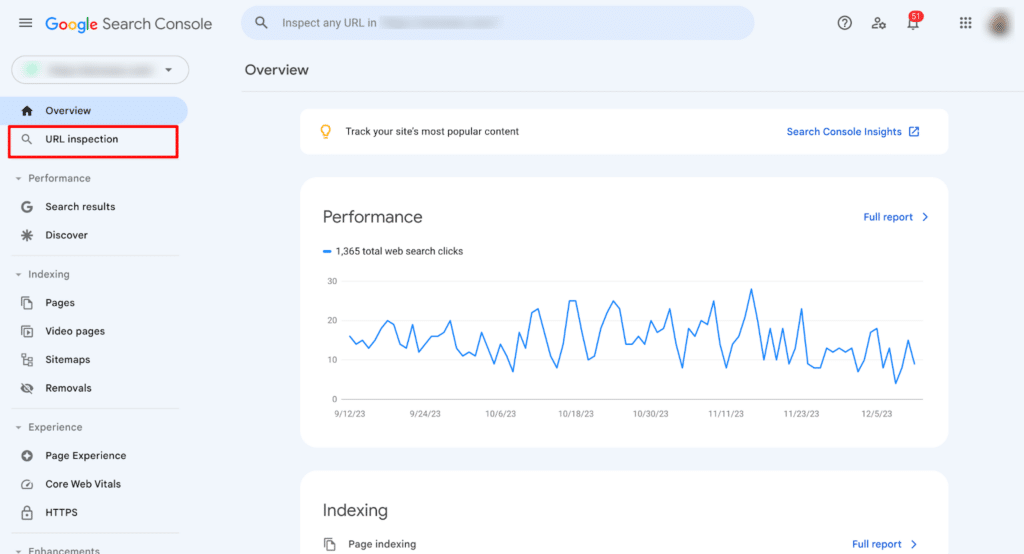
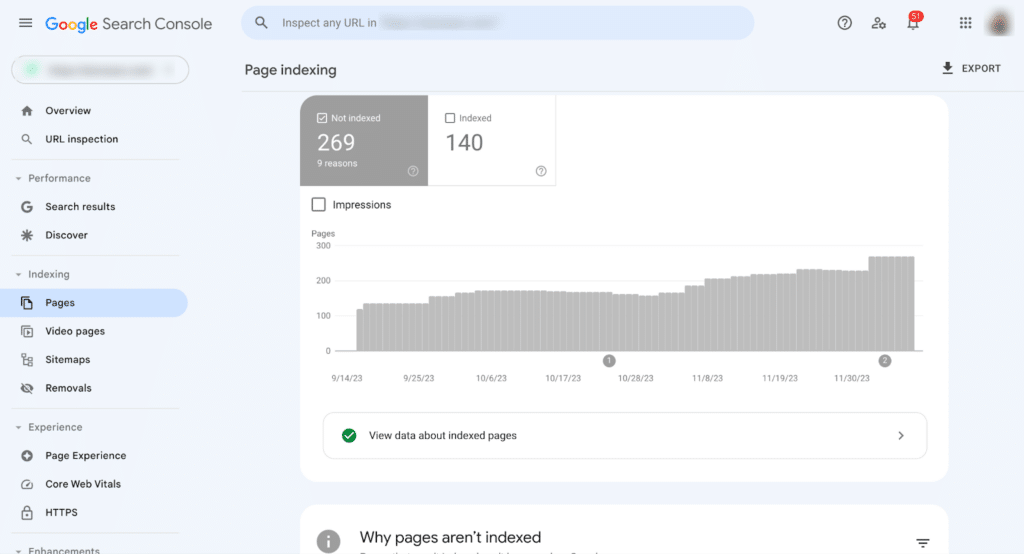
Um zu prüfen, ob Sie Indexierungsprobleme für Shop-Seiten und -Beiträge haben, klicken Sie auf die URL-Überprüfungsoption, wie unten gezeigt. Dadurch erhalten Sie einen Bericht darüber, welche Seiten indexiert sind und welche nicht.
Sobald Sie die Seiten identifiziert haben, die Probleme verursachen, können Sie sie problemlos manuell zur Indizierung übermitteln oder versuchen, die Grundursache für die Leistungsschwäche zu finden.
Überwachen von Umleitungsfehlern
Und schließlich müssen Sie Ihre Weiterleitungs-URLs überprüfen und sicherstellen, dass alle Ihre Weiterleitungs-URLs korrekt und zugänglich sind. Eines der Dinge, die den Benutzern auf einer E-Commerce-Site die schlechteste Erfahrung bescheren, sind defekte Links.
Um Weiterleitungsketten zu reparieren, prüfen Sie, ob sie zu lang sind, und versuchen Sie, sie bei Bedarf zu kürzen. Wenn Sie andererseits Probleme mit Weiterleitungsschleifen haben, entfernen Sie diese einfach, und Ihre Weiterleitung funktioniert einwandfrei.
Abschließender Rat: Bleiben Sie mit der SEO Ihres Shops auf dem Laufenden

Damit sind wir am Ende unseres vollständigen Leitfadens angelangt. Aber damit ist es noch nicht getan. Sie müssen die Google Search Console ständig im Auge behalten, um alle Probleme zu beheben, die auftreten können, um bei der Suche bessere Ergebnisse zu erzielen. Und vergessen Sie nicht, Schauen Sie vorbei und melden Sie sich an für unsere Blogs, um noch viele weitere nützliche Artikel und Neuigkeiten wie diese zu erhalten!


