Avere un sito web che si carica rapidamente ed efficientemente non è solo un lusso; è una necessità. PageSpeed Insights è uno strumento di Google che valuta la velocità di caricamento del tuo sito web e offre preziosi suggerimenti per renderlo ancora più veloce. Non importa se sei un proprietario di un sito web, un content manager o un esperto SEO, dovresti avere le idee chiare su Informazioni sulla velocità di pagina di Google (PSI), le sue metriche e i modi per aumentare il suo punteggio.
In questo blog, condivideremo cos'è PageSpeed Insights di Google, quali metriche utilizza (insieme all'intervallo ideale a cui dovresti mirare) per misurare le prestazioni del tuo sito Web e 10 modi semplici e pratici per migliorare il punteggio di Google PageSpeed Insights per il tuo sito Web. Quindi, se vuoi ottenere un punteggio di 100/100 o vicino a questo benchmark, continua a leggere.
Che cos'è Google PageSpeed Insights?
Google PageSpeed Insights (PSI) è uno strumento gratuito strumento di misurazione delle prestazioni di Google. Questo strumento è utile per analizzare la velocità di pagina di un sito web o di un URL sia su dispositivi mobili che desktop.
Indipendentemente dall'URL inserito in questo strumento, il PSI fornirà un punteggio di performance complessivo dopo aver analizzato varie metriche (maggiori informazioni di seguito). Il punteggio di performance può intervallo da 0 a 100.
Qui, 0 è il punteggio più basso e 100 è il punteggio più alto. Più alto è il punteggio, più ottimizzata è la pagina o il sito web. Un punteggio più alto di solito si traduce in maggiore velocità ed efficienza del sito web analizzato. Una volta che questo strumento completa l'analisi, ti suggerirà le aree in cui migliorare il punteggio e le opportunità di ottimizzazione.
Nota che, nonostante esistano diversi strumenti di controllo della velocità di pagina per i proprietari di siti web, Google PageSpeed Insights (PSI) è il più popolare. Uno dei motivi di tale popolarità può essere che proviene da Google e la maggior parte dei proprietari di siti web intende far sì che il proprio sito web abbia un bell'aspetto su questa piattaforma.
Importanti metriche di PageSpeed Insights e punteggi ideali per l'ottimizzazione
Gli utenti si aspettano che le pagine web si carichino rapidamente e funzionino senza problemi, ed è qui che entra in gioco PageSpeed Insights. Per ottimizzare efficacemente il tuo sito web e ottenere un punteggio migliore su Google PageSpeed Insights, devi comprendere le metriche che utilizza, come CLS, LCP, FID, FCP, INP e TTFB, e i punteggi ideali per queste metriche su vari dispositivi.
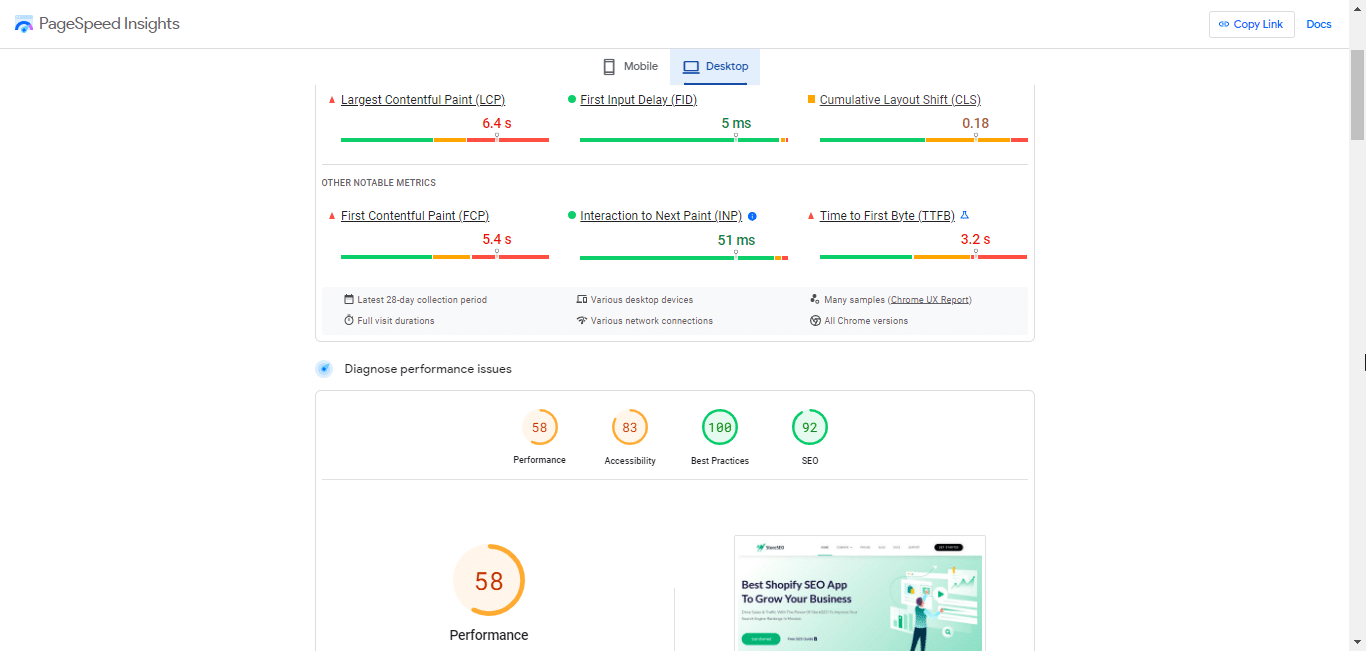
Quindi, come funziona? Bene, una volta inserito il link del tuo sito web su Google PageSpeed Insights e cliccato sul pulsante "Analizza", otterrai un punteggio di performance complessivo (sia per dispositivi mobili che per desktop) basato sulla performance media su diverse metriche. Parliamo di quelle metriche in base alle quali viene calcolato il punteggio di performance complessivo.
Vernice con contenuto più grande (LCP)
Il più grande contenuto di vernice, o LCP, misura la rapidità con cui l'elemento di contenuto più grande all'interno della viewport diventa visibile. Ha un impatto diretto sulla velocità di caricamento percepita della tua pagina. il punteggio LCP ideale è di 2,5 secondi o meno. Tuttavia, devi considerare seriamente questa metrica se è superiore a 4 secondi. Un LCP più veloce assicura che gli utenti possano vedere e interagire con i tuoi contenuti rapidamente.

Ritardo del primo ingresso (FID)
Ritardo del primo input, o FID, valuta la reattività di una pagina web misurando il tempo impiegato dal browser per elaborare la prima interazione di un utente (clic o tocco). Un punteggio FID più basso indica un sito web più reattivo. Google consiglia un ideale Punteggio FID di 100 millisecondi o menoUn punteggio migliore in questo caso garantisce che gli utenti possano interagire con il tuo sito senza troppi ritardi.

Spostamento cumulativo del layout (CLS)
Spostamento cumulativo del layout, o CLS, misura la stabilità visiva di una pagina web. Quantifica la misura in cui gli elementi della pagina si spostano durante il caricamento. Un punteggio CLS basso è fondamentale per garantire un'esperienza utente fluida. Google raccomanda un punteggio CLS pari o inferiore a 0,1Se riesci a raggiungere questo punteggio, i tuoi utenti non saranno frustrati dagli elementi che saltano da una parte all'altra della pagina.

Prima vernice contenta (FCP)
Prima vernice contenta, o FCP, misura il tempo impiegato dal browser per visualizzare il primo contenuto sullo schermo. È un elemento chiave nella percezione della velocità di caricamento della pagina. Secondo Google, dovresti fare del tuo meglio per mantenere un Punteggio FCP di 1,8 secondi o meno per il tuo sito web. Questo punteggio assicura che gli utenti vedano rapidamente contenuti significativi.

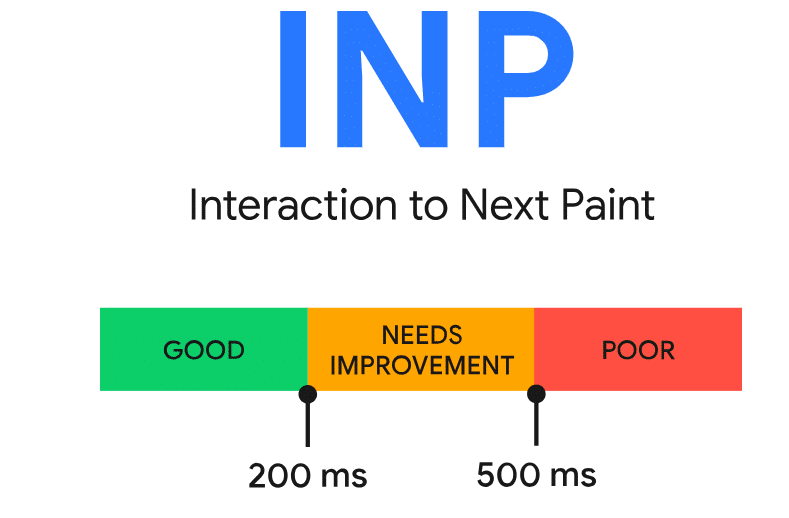
Interazione con la vernice successiva (INP)
Interazione con la prossima vernice, o INP, valuta il tempo impiegato dall'interazione di un utente con la pagina per portare al successivo cambiamento visivo sullo schermo. Un punteggio INP più basso indica un sito Web più reattivo. Dovresti cercare di mantenere il Punteggio INP di 200 millisecondi o meno per dispositivi mobili e desktop. Un buon punteggio in questo caso assicura che le interazioni degli utenti siano tradotte in modo fluido e rapido in modifiche visibili sulla pagina.
Tempo al primo byte (TTFB)
Tempo per il primo byte, o TTFB, misura il tempo impiegato dal browser per ricevere il primo byte di dati dal server. Ha un impatto diretto sul tempo di risposta percepito dal server. Il TTFB ideale il punteggio è di 0,8 secondi o meno. Se hai un punteggio buono, significa che il server risponde rapidamente. Aiuterà a ridurre i tempi di attesa degli utenti e a migliorare la loro esperienza di navigazione.

L'ottimizzazione di queste metriche comporta una combinazione di fattori, tra cui la riduzione al minimo delle risorse di blocco del rendering, l'ottimizzazione delle immagini, lo sfruttamento della cache del browser, la riduzione di JavaScript non necessario e l'ottimizzazione dei tempi di risposta del server. Dare priorità all'ottimizzazione mobile è particolarmente importante, poiché gli algoritmi di ranking di Google considerano la compatibilità con i dispositivi mobili.
Comprendere e raggiungere i punteggi ideali per CLS, LCP, FID, FCP, INP e TTFB su dispositivi mobili e desktop è essenziale per l'ottimizzazione delle pagine web. Puntare a questi punteggi ideali contribuisce a un sito web più veloce e intuitivo. Per raggiungere questi punteggi e migliorare il punteggio complessivo delle prestazioni del tuo sito web sullo strumento PageSpeed Insights, è fondamentale implementare le best practice che condivideremo di seguito.
10 modi per migliorare il punteggio di Google PageSpeed Insights (PSI)
Ora che sai cos'è PageSpeed Insights e quali sono le sue metriche, ti mostreremo 10 modi pratici e semplici per aumentare il punteggio di Google PageSpeed Insights per il tuo sito web o una qualsiasi delle tue pagine web. Ricorda, più riesci a ottimizzare il tuo sito web, migliore sarà il punteggio delle prestazioni su Google PageSpeed Insights.
1. Ottimizza le tue immagini
Le immagini svolgono un ruolo significativo nelle prestazioni web e ottimizzarle può avere un impatto notevole sul tuo punteggio Google PageSpeed Insights. Se ottimizza le immagini del tuo sito web correttamente, puoi facilmente ridurre i tempi FCP e LCP. Inoltre, puoi minimizzare i problemi CLS. Qui esploreremo le strategie chiave per rendere le tue immagini più adatte al web senza entrare troppo nei dettagli.
👉🏽 Immagini dimagranti pesanti
Immagina il tuo sito web come un'auto da corsa. Se trasporta troppo peso, sarà più lento in pista. Lo stesso vale per il tuo sito. Le immagini, come favicon, loghi e immagini di prodotti, possono talvolta costituire una grossa fetta delle dimensioni della tua pagina web. Quando ciò accade, rallenta il tuo sito web e influisce sull'esperienza utente.
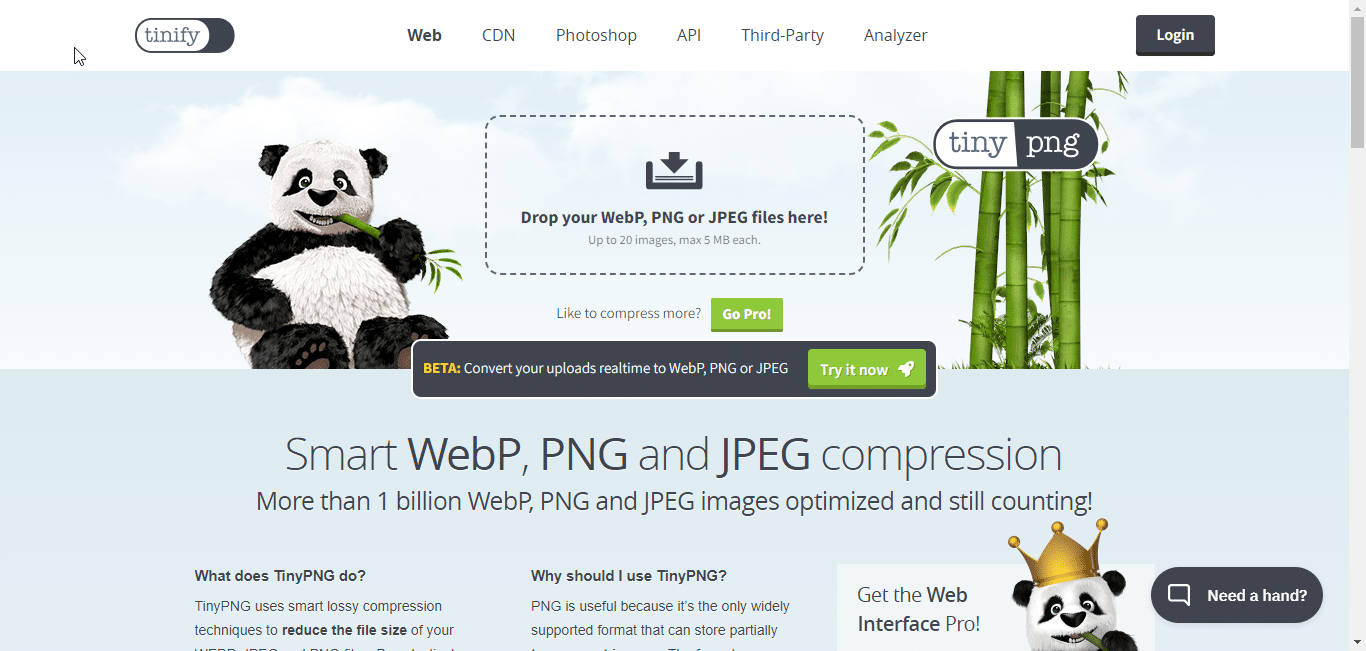
Quindi, qual è la soluzione? Innanzitutto, considera di sostituire le immagini PNG con JPEG. I JPEG sono molto più leggeri e veloci. Inoltre, i compressori di immagini come PNG minuscolo, Guetzli, E Formato JPG 2 PNG può aiutare a ridurre le dimensioni delle tue immagini senza comprometterne la qualità. Potresti anche dover eliminare alcune immagini dal tuo sito web.
Prima di procedere con l'audit dell'utilizzo delle immagini sul tuo sito web, chiediti: "Ho davvero bisogno di tutte queste immagini?" In caso contrario, prendi in considerazione la rimozione di quelle non necessarie per risparmiare dati e migliorare i tempi di caricamento.
👉🏽 Le migliori pratiche per l'ottimizzazione delle immagini
Ora, analizziamo alcune delle migliori pratiche per l'ottimizzazione delle immagini:
Ridimensiona e comprimi le immagini: Ridimensiona le tue immagini alle giuste dimensioni per la tua pagina web. Riduce le dimensioni del file senza perdere troppa qualità. Puoi comprimere le tue immagini in blocco dal tuo sito web WordPress usando Plug-in TinyPNG.
Imposta le dimensioni dell'immagine: Assicurati di specificare l'altezza e la larghezza esatte per ogni immagine nel codice del tuo sito web. Ciò aiuta il browser a caricare la pagina in modo più efficiente, riducendo i cambiamenti di layout e migliorando l'esperienza utente.
Utilizzare una rete per la distribuzione dei contenuti (CDN): Una CDN memorizza le tue immagini in varie posizioni in tutto il mondo e le consegna rapidamente ai visitatori del tuo sito web. Ciò riduce il tempo necessario alle tue immagini per raggiungere il dispositivo dell'utente. Di conseguenza, il tuo sito web si carica più velocemente.
👉🏽 Caricamento lento per un caricamento più veloce
Ecco un trucco fantastico chiamato "lazy loading". È come avere una bacchetta magica per rendere il tuo sito web più veloce. A volte, le pagine web caricano immagini che non riesci ancora a vedere sullo schermo. Queste immagini nascoste rallentano la tua pagina.
Il caricamento lento funziona così: carica le immagini solo quando servono. Immagina un libro in cui la pagina successiva appare solo quando lo giri. Questo può farti risparmiare un sacco di tempo, specialmente su dispositivi mobili con connessioni Internet lente.
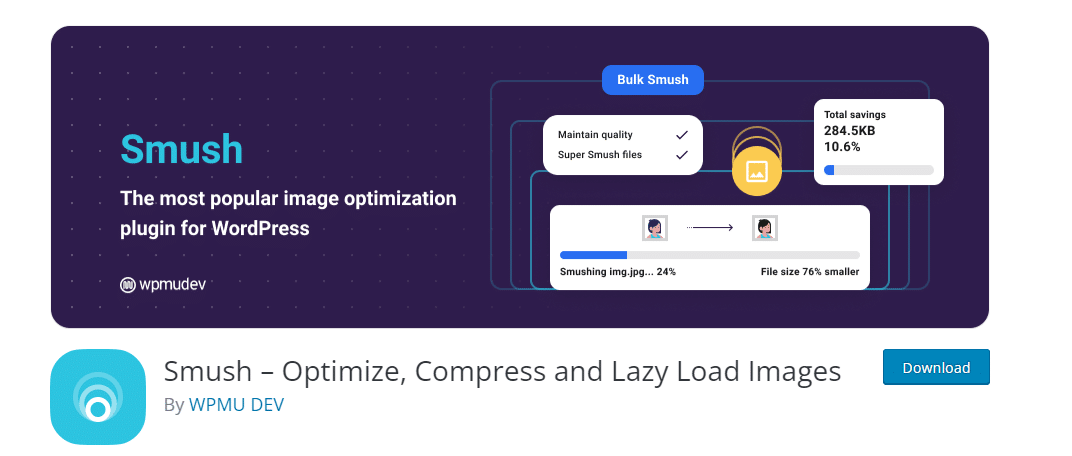
Se utilizzi WordPress, ci sono plugin come “Caricamento pigro" O "Schiacciare" che può farlo per te.
2. Usa un tema più veloce e pulito
Ci sono alcuni temi che sono realizzati tenendo a mente la velocità del sito web. Questi temi sono più leggeri e reattivi e hanno la compressione GZIP integrata.
Puoi controllare questo elenco di Temi e-commerce Shopifye decidi se dovresti prendere in considerazione l'aggiornamento del tema del tuo sito web per migliorare i tuoi punteggi PSI e la SEO complessiva.
3. Incorpora contenuti video
Se vuoi caricare video sul tuo sito web, il nostro consiglio è: non farlo. Caricare video direttamente sul tuo sito web può sovraccaricare il tuo sito web. È particolarmente problematico e stressante per il tuo server web quando più utenti riproducono i tuoi video contemporaneamente.
Quindi, cosa puoi fare? Non prenderti la briga di caricare il tuo video direttamente sul tuo sito web. Carica invece i tuoi video su piattaforme come YouTube, Vimeo o Dailymotion e poi incorpora il video sul tuo sito web utilizzando IncorporaPressTi aiuterà a migliorare significativamente la velocità di caricamento della tua pagina e a migliorare il punteggio del tuo sito web su Google PageSpeed Insights.
Un'altra cosa: se vuoi condividere qualcosa di animato sul tuo sito web, prendi in considerazione l'utilizzo di file in formato GIF dopo averli compressi con Compressore GIFPuoi anche modificare la tua GIF con una varietà di strumenti come Gif facileAssicurati che le GIF siano brevi per mantenere stabile la velocità della tua pagina.
4. Dare priorità ai contenuti above-the-fold
Anche se potrebbe sembrarti strano, dovresti sapere che il caricamento della pagina non riguarda solo la velocità con cui si carica. Anche le prestazioni percepite sono un fattore importante da misurare.
COSÌ cos'è la prestazione percepita? Beh, in parole semplici, la performance percepita è "quanto velocemente un sito web appare agli utenti quando si carica". Non riguarda esattamente la velocità di caricamento del tuo sito web e non può essere misurata con alcuno strumento di test per siti web. Piuttosto, riguarda la prospettiva o l'esperienza degli utenti.
Se tieni a migliorare le prestazioni percepite, dovresti dare priorità al caricamento di contenuti importanti per i tuoi utenti. Facciamo un esempio per chiarire: il contenuto above-the-fold del tuo sito web deve essere caricato prima di qualsiasi widget di terze parti.
5. Abilitare e sfruttare la memorizzazione nella cache del browser
Immagina di leggere un libro di fiabe avvincente. Ora, pensa a un segnalibro che ricorda l'ultima pagina che hai letto, così puoi continuare subito l'avventura la volta successiva. La memorizzazione nella cache del browser è un po' come quel segnalibro per le pagine web. È un trucco fantastico che aiuta le pagine web a caricarsi più velocemente, specialmente per i visitatori di ritorno.
Quindi, come funziona? Quando i tuoi visitatori visitano una pagina del tuo sito web, le immagini e i video vengono salvati sui loro dispositivi. La volta successiva che tornano, il loro browser non deve recuperare di nuovo quelle immagini e quei video dal web. Il browser li carica rapidamente dalla sua memoria, facendo apparire la pagina in un attimo.
In altre parole, la memorizzazione nella cache del browser aiuta il browser dei tuoi visitatori a "ricordare" alcune parti di una pagina web che sono state caricate di recente, come l'intestazione, la navigazione e il logo. In questo modo, il loro browser non ha bisogno di recuperare quegli elementi invariati ogni volta che visitano una pagina web e ottengono tempi di caricamento super rapidi.
È importante notare che Google consiglia una politica di caching minima di una settimana. Tuttavia, fino a un anno va bene per gli elementi che non cambiano frequentemente.
Ora, ecco la parte interessante: più il browser dei tuoi visitatori può memorizzare nella cache, meno deve caricare quando visitano una pagina web. Il risultato? Le pagine web si caricano più velocemente e i visitatori possono godersi il contenuto senza dover aspettare. E come bonus, ottieni un punteggio più alto in Google PageSpeed Insights per il tuo sito web.
6. Correggere i reindirizzamenti di più pagine
Sai cosa succede quando reindirizzi una pagina a un altro URL? Quando provi a visitare una pagina e questa è stata reindirizzata, il server comunica al tuo browser che la pagina è stata spostata. Quindi, il tuo browser deve recuperare il nuovo URL. Questo passaggio aggiuntivo può rallentare il caricamento della tua pagina.
Ecco perché è fondamentale ridurre al minimo i reindirizzamenti quando possibile. Anche un solo reindirizzamento può influire sulla velocità della pagina, ma le cose possono complicarsi quando si incontrano più reindirizzamenti di seguito. Chiamiamo questo una "catena di reindirizzamenti". Spesso si verificano quando le vecchie pagine vengono sostituite con quelle nuove, lasciando una scia di reindirizzamenti.
Google può gestire fino a 10 reindirizzamenti senza problemi. Ma le catene di reindirizzamento possono rallentare il tuo sito senza una buona ragione. Per aumentare il tempo di caricamento della tua pagina e il punteggio PageSpeed Insights, è meglio mantenere le cose semplici. Reindirizza direttamente dall'URL originale a quello più recente. Per affrontare queste catene di reindirizzamento, puoi usare strumenti SEO come Semrush.
Se noti delle catene di reindirizzamento, puoi risolverle anche dal tuo sito web WordPress. Collegamenti migliori Il plugin ti consentirà di accorciare, gestire e tracciare qualsiasi URL, oltre ad aiutarti con molteplici opzioni di reindirizzamento.
Mantenendo i tuoi redirect semplici e riducendo al minimo le catene di redirect, non solo migliorerai la velocità della tua pagina, ma renderai anche il tuo sito web più user-friendly e SEO-friendly. È come liberare la strada per i tuoi visitatori online, aiutandoli a raggiungere la loro destinazione più velocemente.
7. Riduci CSS, HTML e JavaScript
Capire come migliorare le prestazioni del tuo sito web può essere essenziale, soprattutto se vuoi raggiungere il punteggio massimo di Google PageSpeed Insights.
Minimizzazione del codice è come riordinare una stanza disordinata. Comporta la rimozione di elementi non necessari o ridondanti dai file CSS, HTML e JavaScript senza comprometterne la funzionalità. Così facendo, riduci le dimensioni del file, con conseguenti tempi di caricamento più rapidi.
Ecco perché la minimizzazione è fondamentale per l'ottimizzazione del sito web:
File CSS: Il CSS è responsabile dello stile del tuo sito web. Tuttavia, a volte può contenere spazi extra, commenti e codice ridondante. La minimizzazione del CSS implica l'eliminazione di questi elementi non essenziali, rendendo il file più snello e veloce da caricare.
JavaScript: JavaScript è il linguaggio di programmazione alla base dell'interattività sul tuo sito. JavaScript ottimizzato significa rimuovere caratteri e spazi vuoti non necessari, con conseguente codice più efficiente che si carica rapidamente.
Italiano: L'HTML è la struttura delle tue pagine web. Potrebbe contenere elementi extra che non sono necessari per visualizzare la pagina. La minimizzazione dell'HTML elimina questi bit superflui, migliorando la velocità di caricamento.
Per ottenere la minimizzazione, puoi utilizzare vari strumenti:
- Per HTML, prendere in considerazione l'utilizzo di Minizzatore HTML.
- Per minimizzare i CSS, strumenti come CSSNano e csso sono efficaci.
- Per JavaScript, UglifyJS2 e il Closure Compiler sono scelte popolari.
Utilizzando questi strumenti puoi rimuovere automaticamente gli elementi non necessari dal tuo codice, ottimizzando così le prestazioni del tuo sito web.
Tuttavia, se si punta a tempi di caricamento rapidissimi, è anche possibile esplorare Pagine mobili accelerate di Google (AMP) e AMP per annunci. Questi framework consentono di creare pagine con versioni semplificate di HTML, CSS e JavaScript, garantendo un caricamento quasi istantaneo.
Inoltre, se il tuo sito web funziona su WordPress, puoi utilizzare plugin come "Hummingbird", "Cache di LiteSpeed,” o “W3 Total Cache” per semplificare il processo di minimizzazione. Questi plugin semplificano il codice, rendendo il tuo sito web più veloce senza la necessità di modifiche manuali.
Incorporare la minimizzazione del codice nella strategia di ottimizzazione del tuo sito web può migliorare significativamente le prestazioni del tuo sito, con conseguenti esperienze utente migliorate e punteggi PageSpeed Insights migliori. Rimuovendo il bagaglio in eccesso dal tuo codice, sei sulla buona strada per un sito web più veloce ed efficiente.
8. Utilizzare il caricamento asincrono per JavaScript
Se vuoi che il tuo browser web sia più efficiente nel multitasking, dovresti optare per il caricamento asincrono. Il motivo è che per il caricamento sincrono, tutte le azioni vengono messe in pausa dal browser quando il file JavaScript viene caricato.
Tuttavia, questo è diverso per il caricamento asincrono. Perché consente al browser di eseguire altre attività, come caricare un foglio di stile CSS o dipingere una tabella in modo abbastanza fluido durante il download di JavaScript. A proposito, poiché questa è una strategia tecnica, dovresti consultare uno sviluppatore web per implementarla.
9. Eliminare le risorse che bloccano il rendering
Uno dei motivi per cui una pagina web richiede molto tempo per caricarsi sono gli elementi o le risorse che bloccano il rendering. Che si tratti di risorse come CSS, JavaScript o file di font, competono per caricarsi più velocemente di qualsiasi altro elemento della pagina. Puoi facilmente sbarazzarti di questo problema, rendere la tua pagina web più veloce e migliorare il punteggio Google PSI semplicemente eliminando le risorse che bloccano il rendering.
Come? Bene, una volta terminato il report PSI, vai alla sezione "Opportunità" e trova il link "Elimina risorse di blocco del rendering". Ora, fai clic sulla freccia in basso accanto all'opzione per visualizzare un elenco di risorse responsabili del caricamento più lento della pagina web. Dall'elenco, avrai un'idea delle risorse che stanno rallentando il caricamento della tua pagina web. Inoltre, otterrai una stima di quanti millisecondi puoi risparmiare eliminando le risorse. Ora, è il momento di capire quali risorse puoi rimuovere.
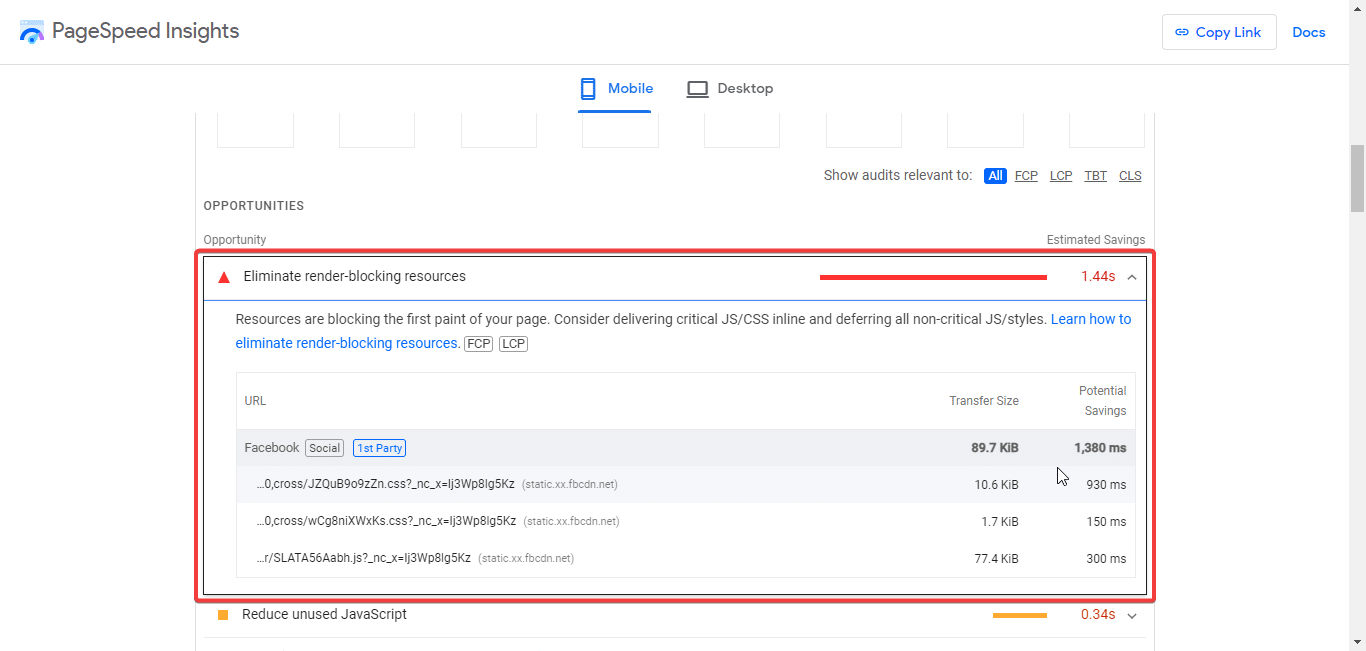
Assicurati di rimuovere solo quelle che non sono essenziali per la funzionalità complessiva della pagina web che stai per ottimizzare. Tuttavia, è un po' tecnico rimuovere queste risorse in modo accurato senza rompere la tua pagina web. Quindi, dovresti assumere uno sviluppatore esperto per eliminare le risorse che bloccano il rendering se non sei molto bravo in questo.
10. Smetti di usare troppo codice di terze parti
Quando usiamo la frase "codice di terze parti", intendiamo script, pixel e plugin. Tutti questi possono essere responsabili del rallentamento della velocità di caricamento della tua pagina web. E hanno un impatto negativo sul tuo punteggio del test Google PageSpeed Insights.
Il codice di terze parti proviene in gran parte da altre aziende e ti consente di esplorare varie opportunità e miglioramenti. Alcuni codici di terze parti come il pixel di Google Analytics o il pixel di Facebook sono effettivamente necessari per monitorare e misurare le prestazioni del sito Web e il tracciamento delle campagne pubblicitarie.
Tuttavia, il tuo sito web potrebbe contenere anche codice di terze parti o plugin che non usi più o che non sono più necessari. In tal caso, la soluzione migliore è quella di controllare regolarmente tutto il codice di terze parti sul tuo sito web e rimuovere tutto ciò che non è importante.
Quando prepari il tuo report PageSpeed Insights, Google contrassegna non solo il codice di terze parti, ma anche la dimensione del trasferimento e il tempo di blocco del thread principale. Ciò che dovresti fare è scoprire i nomi delle aziende che eseguono codice sul tuo sito dalle barre grigie. Puoi creare un elenco dei nomi delle aziende e quindi rimuovere quelli di cui non hai più bisogno. Potresti dover eliminare il codice dal CMS che stai utilizzando o disinstallare i plugin dal tuo sito web WordPress.
📈 Inizia a migliorare le prestazioni di Google PageSpeed Insights
È essenziale riconoscere che le prestazioni web non riguardano solo numeri e punteggi; si tratta di offrire un'esperienza fluida e piacevole ai tuoi visitatori. I principi di chiarezza ed efficienza sono le chiavi e dovresti tenerli a mente mentre ottimizzi il tuo sito web per il tuo pubblico di riferimento.
Implementando le strategie di cui abbiamo parlato, non solo puoi far caricare il tuo sito web più velocemente, ma anche lasciare un'impressione positiva e duratura su coloro che interagiscono con esso. Se hai domande o opinioni, sentiti libero di farcelo sapere nella sezione commenti qui sotto. Inoltre, iscriviti al nostro blog notiziario.


