When you are creating your Shopify store, an XML sitemap is automatically generated. But to get a Shopify HTML sitemap for your store, you may have to go a step further. Now you might be wondering, what exactly is a sitemap? It’s literally a map for your store, as the name says.

Websites nowadays include so much content, information, and products that it might be tough to discover what you’re searching for. A Shopify HTML sitemap helps search engine crawlers to navigate through all of your store’s pages.
What Is an HTML Sitemap For Shopify Store?
An HTML sitemap of your Shopify store is a table of contents, providing clickable links to different pages on your site, and often includes short descriptions.
Having an HTML sitemap makes it easier for people to navigate your site, creating a user-friendly experience.
Note that, HTM L sitemaps are created for users, not Google or other search engines. Unlike XML sitemaps, you can’t submit an HTML sitemap to the Google Sitemaps program specifically, it’s highly recommended for improving user navigation. Search engines, like Google, prefer websites with clear structures and text-based links, making it easier for them to index and understand your content.
If creating a Google Sitemap in the proper XML format seems challenging, you have an alternative. You can submit a simple text file listing the URLs on your site. This ensures that even if you can’t create the ideal XML file, search engines can still find and index your web pages. In essence, Google Sitemaps are for search engines, while HTML sitemaps are for your website visitors, both contributing to a better overall online experience.

Shopify HTML Sitemap Examples
HTML Sitemap is a navigational aid resembling a regular webpage, displaying a comprehensive list of crucial pages to facilitate seamless user navigation throughout the website. Here is an example of an Apple Sitemap.

For large companies like Microsoft and Airbnb, the HTML sitemap could play a crucial role in organizing a vast amount of information and products available on their websites. It may include categories, subcategories, and links to key sections to streamline the user experience. This is especially important for e-commerce platforms like Walmart, where customers may be looking for specific products or categories.
HTML Sitemap vs XML Sitemap vs Image Sitemap
HTML sitemaps enhance user navigation, XML sitemaps aid search engines, and Image sitemaps optimize visibility for images on your website.
HTML Sitemap
An HTML Sitemap is like a helpful map for people visiting a website. It’s a special page that lists and links to all the important places on the site. Just like a table of contents in a book, an HTML Sitemap makes it easy for users to find what they’re looking for and explore different parts of the website quickly.
XML Sitemap
Think of an XML Sitemap as a secret guide for search engines. It’s a file that contains a list of all the pages on a website, along with some extra information like when each page was last updated. This helps search engines understand the structure of the site and find all the pages easily, making sure they don’t miss anything important.
Image Sitemap
An Image Sitemap is a special map just for pictures on a website. It’s like a gallery guide, listing all the images and providing details about them. This helps search engines recognize and show these images in search results, making it more likely for people to discover and enjoy the pictures when they’re looking for something specific.
| Comparison Factors | HTML Sitemap | XML Sitemap | Image Sitemap |
| Sitemap URL | The Sitemap URL for HTML sitemaps provides a direct link to a user-friendly web page listing all important links for easy navigation. | The XML Sitemap URL leads to a file primarily designed for search engines, containing URLs and additional information to aid in efficient crawling and indexing. | The Image Sitemap URL directs to a file focused on organizing image URLs and details for enhanced image search visibility. |
| Contains | Contains clickable links and simple information, aiding users in finding and navigating through various pages on the website. | Contains URLs and additional details, providing search engines with essential information about the structure and last modification of the pages. | Contains URLs for images along with related details, facilitating search engines in indexing and ranking images for improved visibility. |
| Designed for | Designed for easy navigation by users, helping them quickly locate and access different sections or pages of the website. | Primarily designed for search engines, assisting in efficient crawling, indexing, and understanding the hierarchy and changes on the website. | Specifically designed for organizing images, making it easier for search engines to index and display images in search results. |
| SEO Benefit | Boosts user experience by enhancing site navigation, indirectly contributing to better SEO performance through increased user engagement. | Improves search engine optimization by providing valuable information to search engines, ensuring more accurate and comprehensive indexing of web pages. | Enhances image SEO by organizing image information, leading to improved visibility and ranking in image search results. |
Why You Need HTML Sitemap For Your Store
An HTML sitemap serves as a user-friendly guide, listing all important links in one place, and making website navigation effortless for visitors.
Improves Your User Experience
An HTML sitemap plays a crucial role in enhancing the overall user experience on your store’s website. It acts like a roadmap, guiding visitors with a clear and organized layout of all the important links. This makes it a breeze for users to navigate through different sections, discover products easily, and have an enjoyable browsing experience.
Helps Organize Websites with Large Product Inventory
For stores with a vast array of products, an HTML sitemap acts as a virtual organizer. It neatly categorizes and presents all products in one accessible place, making it efficient for users to browse and locate specific items. This organizational structure simplifies the shopping journey, especially in stores with extensive product inventories.
Accelerate Crawling & Indexing for Better SEO
The HTML sitemap serves as a speedy guide for search engines, expediting the process of crawling and indexing web pages. This efficiency is crucial for SEO, as it ensures that search engines quickly understand the content and structure of your site, leading to improved visibility and ranking in search results.
Creates Internal Links
An HTML sitemap establishes valuable internal links within your website. These links act as pathways, connecting different pages and sections. By creating this network of internal links, the sitemap enhances the interconnectedness of your content, promoting a seamless flow of navigation for users and aiding in search engine optimization efforts.
Understand HTML Sitemap With StoreSEO: The Ultimate Shopify SEO Solution
Understanding Shopify SEO may be difficult for any eCommerce entrepreneur. Learning about technical SEO and creating sitemaps for Shopify, in particular, may be highly complicated if you are unfamiliar with these topics.
To assist you, you can read our comprehensive guide to learn all you need to know about Shopify sitemaps and how they affect your online store’s search rankings.

Best Way To Create HTML Sitemap In Shopify: 4-step Guide
Here is the simplified 4-step guide we’ve put together to effortlessly create HTML sitemaps for the Shopify store-
Step 1: Install The StoreSEO App On Your Store
StoreSEO is an app that lets you create an HTML Sitemap for your Shopify store, along with a handful of other SEO benefits.
To install the StoreSEO app, first, you need to create a Shopify store account.
First, you need to click on the ‘Apps‘ option from your Shopify admin dashboard.

It will redirect you to the Shopify Apps Store page.
From here, search for ‘StoreSEO‘ in the search bar and click on the app. Afterward, hit the “Install” button.

You will be redirected to Shopify from where you can install the app by clicking on the ‘Install App’ button.

Now, you need to fill up all the necessary forms by giving accurate information about your store.

Step 2: Generate HTML Sitemap
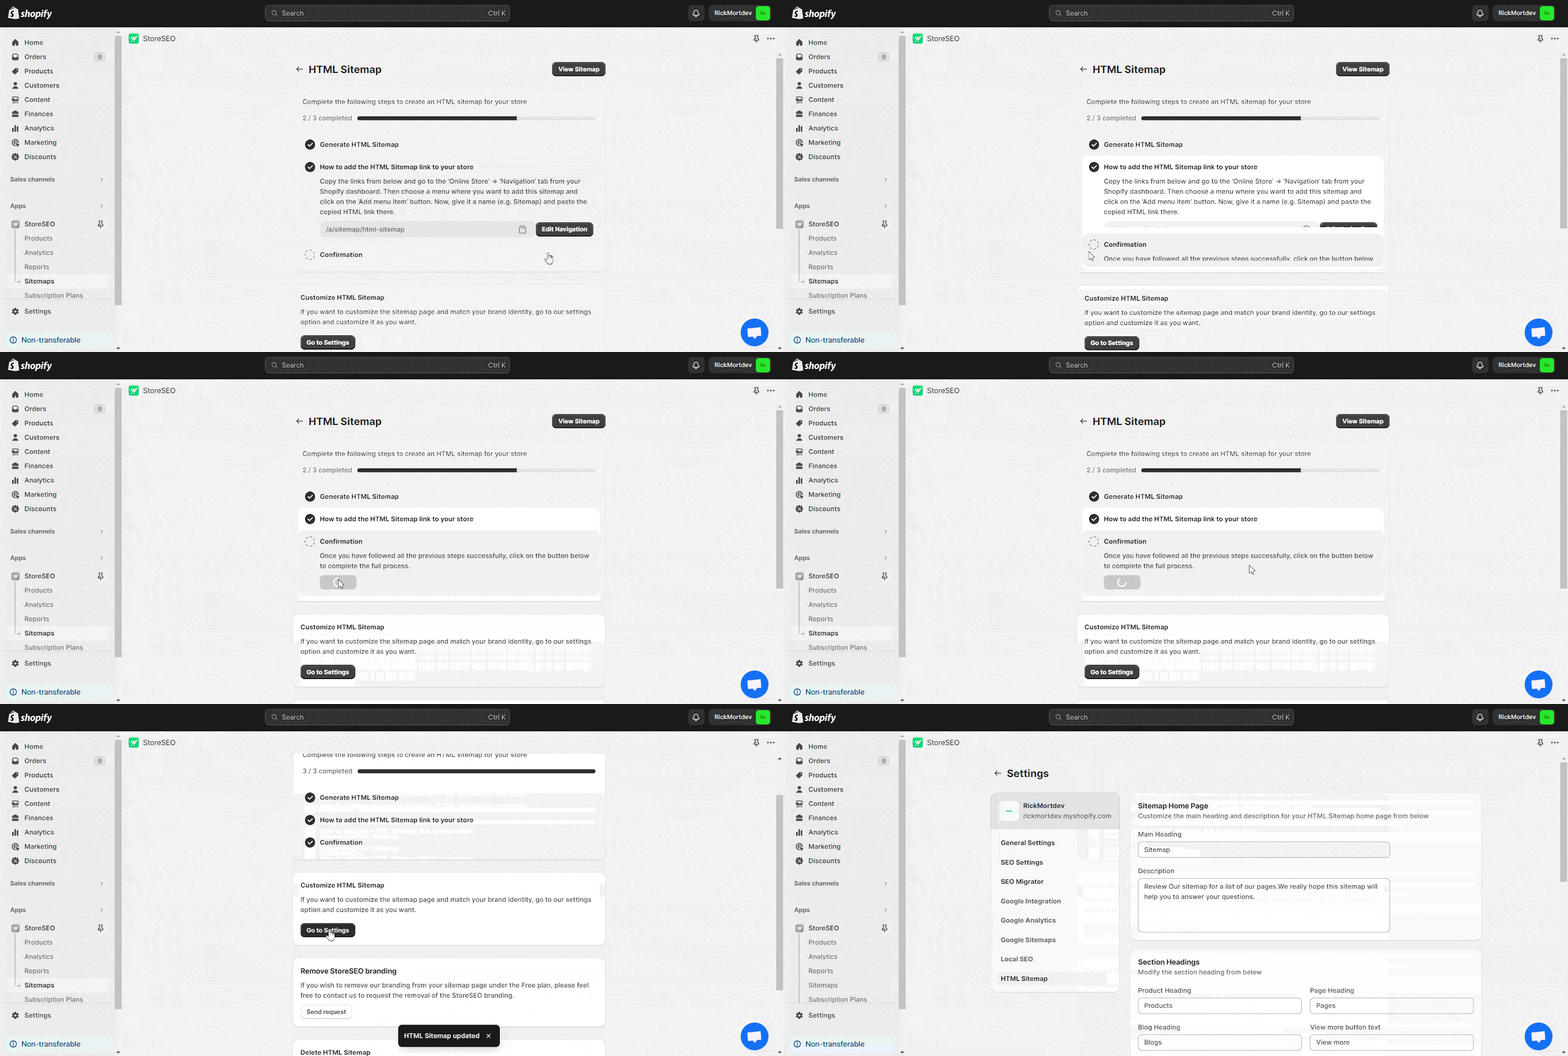
Log in to your Shopify store and go to the ‘Sitemap’ tab from the StoreSEO app dashboard. Click on the ‘HTML Sitemap’ button to generate a Sitemap.

Hit the ‘Generate Now’ button, and then the sitemap will be automatically generated. Then copy the URL to your sitemap.

After copying the URL, click the ‘Edit Navigation’ button. This will redirect you to the Navigation tab of your Shopify store.

Step 3: Customize Your Sitemap
The StoreSEO app automatically creates a default sitemap URL for users, but you have the flexibility to customize it according to your preferences or requirements. To personalize the sitemap URL, go to Manage Apps –> Apps and Sales Channels -> App Proxy within the ‘Sitemap‘ tab. Click the ‘Customize URL‘ button, make the desired modifications to the sitemap URL, and save the changes.
Step 4: Add HTML Sitemap Link In Your Store
Include a new menu or select an existing one in the desired location for the HTML Sitemap. In this instance, let’s incorporate the Sitemap into the ‘Footer’. Choose the menu and add an item, specifying a name and pasting the Sitemap URL link. Afterward, save the menu settings to finalize the process.

After adding the HTML Sitemap link to your store, you can hit the ‘Confirm’ button to go to the next step of customizing it.

Customize HTML Sitemap
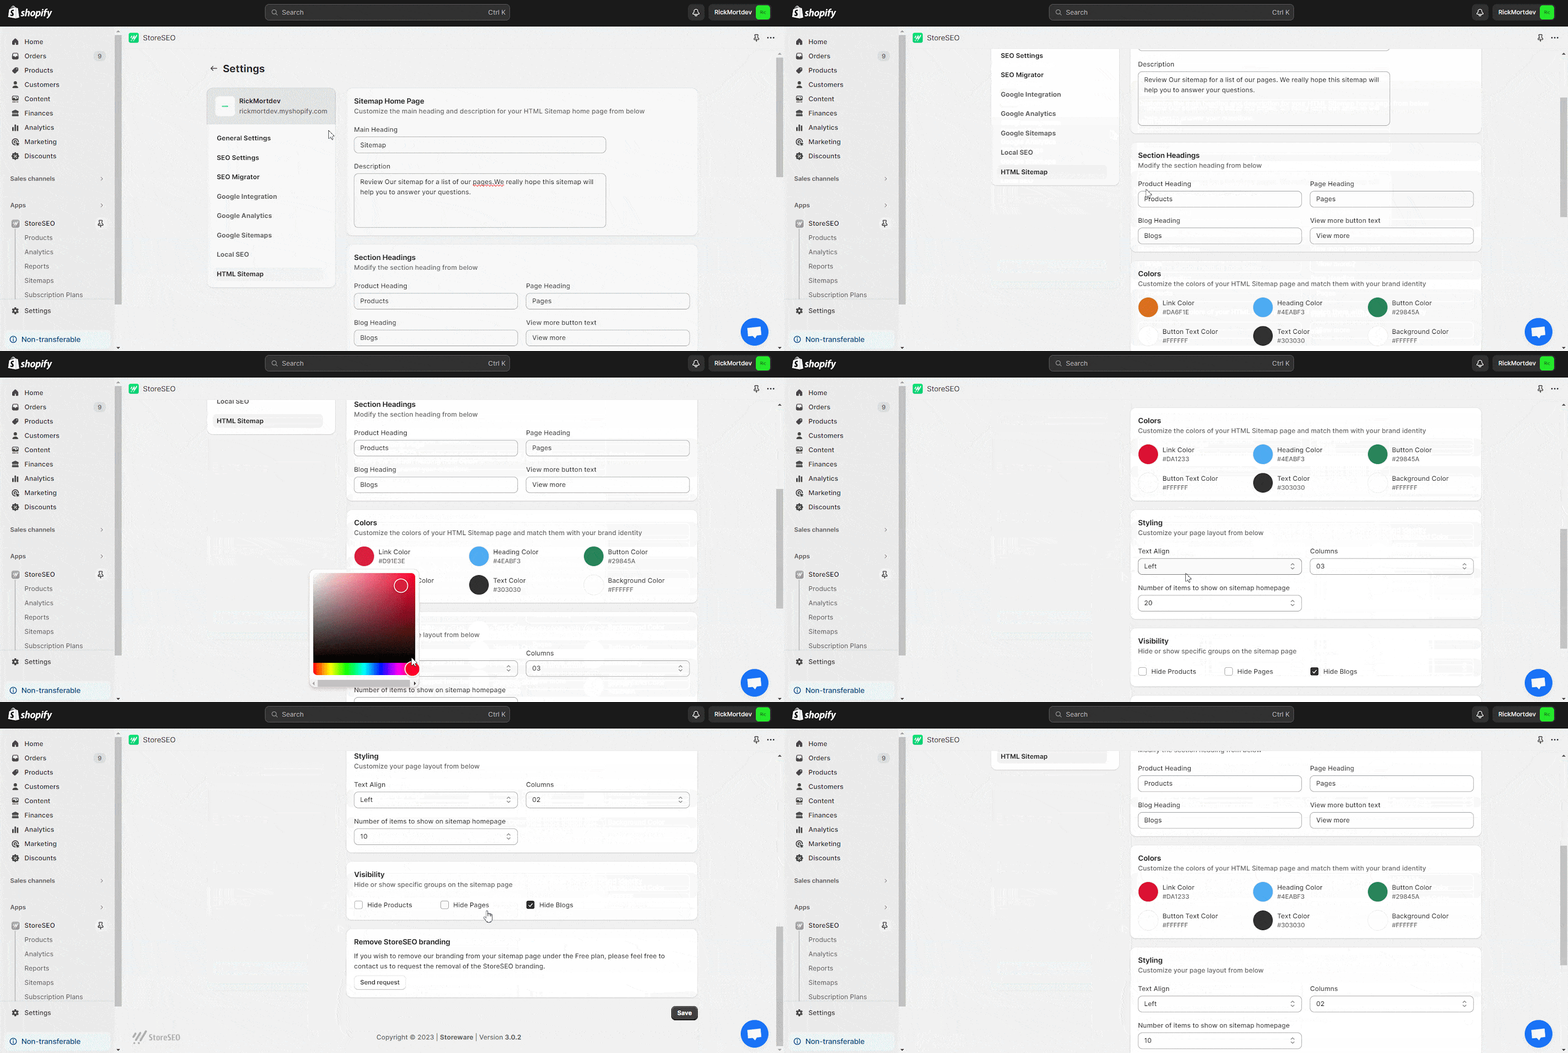
Tailor the HTML Sitemap for your store by adjusting elements such as the Heading, Description, Section Heading, and selecting colors to align with your brand identity. Customize Styling and configure Visibility for specific groups as needed. Once all preferences have been personalized, click the ‘Save‘ button to apply the changes.

Creating an HTML Sitemap is a complementary feature included in the StoreSEO app for your Shopify store. It’s important to note that a ‘Powered by StoreSEO’ branding will be present in your store. If you wish to eliminate this branding, simply click the ‘Send request’ button to communicate your request to the StoreSEO team.

Once you’ve added and personalized the HTML Sitemap, your store’s sitemap page will resemble the example below.

This is how easily you can generate an HTML Sitemap for your Shopify store with StoreSEO.
Alternative Method to Add HTML Sitemap Manually
Creating a new template in Shopify for your sitemap is a straightforward process. Begin by navigating to “Online Store” and then selecting “Themes” from your Shopify admin panel. In the “Live theme” section, click “Actions,” followed by “Edit Code.” Next, under the “Templates” folder, add a new template, choose “page” from the dropdown menu, and name it “sitemap.”
Click the “Create template” button to finalize the setup. This simple procedure allows you to customize your store’s sitemap by adding special lines of code to enhance its functionality and appearance.

This is the special template where you’ll put in some unique code. It’s crucial to insert the code right under the line that says {{ page.content }} to make sure you keep the regular page style. To display all your products and collections, include the code below in your new template page:
| <div class=”row”><div class=”col-md-6″><h2>Collections</h2><ul>{% for c in collections %}<li><a href=”{{ c.url }}”>{{ c.title }}</a></li>{% endfor %}</ul></div><div class=”col-md-6″><h2>Products</h2><ul>{% for product in collections.all.products %}<li><a href=”{{ product.url }}”>{{ product.title }}</a></li>{% endfor %}</ul></div></div> |
Note: The provided code comes with Bootstrap formatting, and if you want to display it in two separate columns, you may need to adjust the div classes.
Now that you’ve made the template, it’s time to set up a new page for your sitemap. Here’s how: Go to “Online Store” in your Shopify admin, then click on “Pages” and hit the “Add page” button on the top right. Title the page as “Sitemap” and keep the content section empty. On the right-hand side, under the Template section, choose “page.sitemap.”

How to Customize the Shopify HTML Sitemap
Customizing your Shopify HTML Sitemap is a straightforward process that allows you to tailor it to your specific needs. Whether you want to add products, collections, pages, blogs, or essential pages like legal and privacy policies, or even custom links, here’s a step-by-step guide
To Add Products, Collections, Pages or Blogs
Step 1: Access the Sitemap Template
Firstly, locate the Sitemap template you’ve created. In your Shopify admin panel, navigate to “Online Store” and then “Themes.” Click on “Actions,” followed by “Edit Code.” Look for your Sitemap template.

Step 2: Insert Code for Content
Under {{ page.content }}, add the necessary code for the content you want to display, whether it’s products, collections, pages, or blogs. Ensure proper formatting, and feel free to adjust Bootstrap classes for styling.
| <div class=”row”><div class=”col-md-6″><h2>Collections</h2><ul>{% for c in collections %}<li><a href=”{{ c.url }}”>{{ c.title }}</a></li>{% endfor %}</ul></div><div class=”col-md-6″><h2>Products</h2><ul>{% for product in collections.all.products %}<li><a href=”{{ product.url }}”>{{ product.title }}</a></li>{% endfor %}</ul></div></div> |
Step 3: Save and Preview
After adding your desired content, save the changes to your template. Preview the page to ensure everything looks as expected. Adjustments can be made as needed.
To Add Essential Pages Like Legal or Privacy Policy
Step 1: Create Essential Pages
Go to “Online Store” in your Shopify admin, click on “Pages,” and then select “Add page” in the top right corner. Create pages for legal or privacy policy and leave the content section empty.

Step 2: Link to Sitemap Template
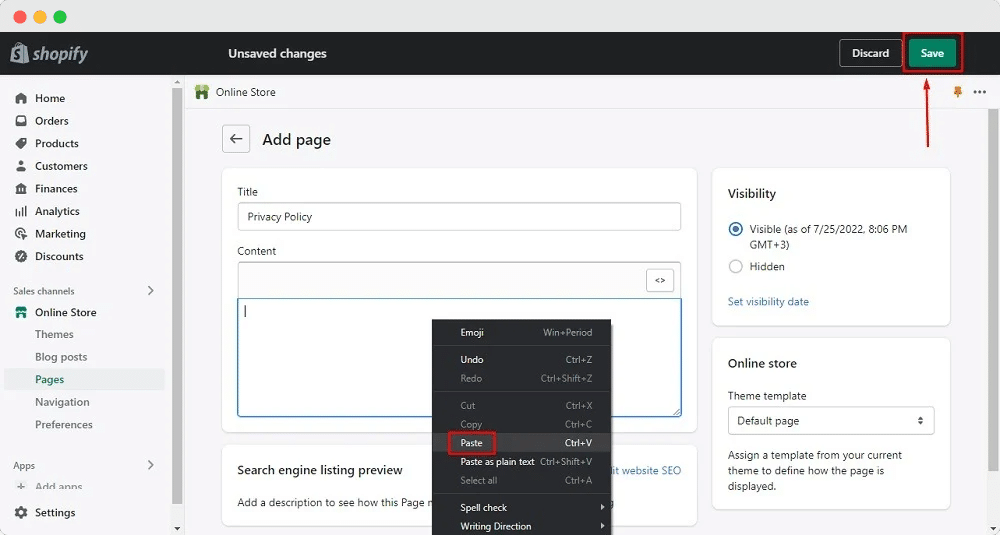
Enter “Privacy Policy” in the page title field, and click the code icon button in the content field menu to reveal the HTML.
After you’ve crafted the Privacy Policy, let’s grab the text for the policy. In the “Copy your Privacy Policy” section, select “Copy this to clipboard.”

Return to the Shopify Store page. Paste the HTML code into the Content editor field, and then click the Save button.

Step 3: Save and Verify
Save the page, and make sure to check that the essential pages are now part of your customized HTML Sitemap.
To Add Custom Links
Step 1: Determine Link Structure
Decide on the custom links you want to include in your HTML Sitemap, such as external references or additional pages within your site.
Step 2: Insert Links in the Sitemap Template
Navigate to the Sitemap template, and add the custom link code under {{ page.content }}, ensuring proper formatting and placement.
Step 3: Confirm and Save
Verify that the custom links appear as intended by saving your changes and previewing the Sitemap. Make adjustments if needed, and your customized Shopify HTML Sitemap is now ready to enhance user navigation on your store.
How To Remove Link To Your HTML Sitemap In Shopify
Below we will discuss a simple step-by-step process on how to remove the link from your Shopify store.
Step 1: Access the Navigation Section
Log in to your Shopify admin Navigate to “Online Store” and then click on “Navigation.”

Step 2: Choose the Menu for Editing
On the Navigation page, locate and click on the title of the menu you wish to edit.

Step 3: Identify and Delete Menu Item
Within the selected menu, identify the specific item you want to remove then click on “Delete” next to the menu item you wish to eliminate.

Step 4: Confirm Deletion
After clicking “Delete,” a confirmation prompt will appear after that click “Remove” to confirm the deletion of the selected menu item.

Step 5: Save Changes
To ensure the changes take effect, click on “Save menu” after you’ve removed the desired menu item.
HTML Sitemap Best Practices to Boost Customer Experience
When crafting your HTML Sitemap to enhance customer experience, keep these simple yet effective practices in mind
Clear and Organized Structure
Ensure your HTML Sitemap has a straightforward structure, much like a table of contents, making it easy for customers to navigate through different sections of your website.
Descriptive Link Labels
Use clear and descriptive labels for each link in your HTML Sitemap. This helps customers easily understand the content they will find when clicking on a particular link.
Alphabetical or Logical Order
Arrange the links in your HTML Sitemap either alphabetically or in a logical order. This helps customers find what they’re looking for quickly, improving their overall browsing experience.
Mobile-Friendly Design
Optimize your HTML Sitemap for mobile devices, ensuring it remains user-friendly and easy to navigate for customers accessing your site on smartphones or tablets.
Regularly Update Content
Keep your HTML Sitemap up-to-date by regularly adding new pages or removing outdated ones. This ensures that customers always have access to the most current information, enhancing their experience on your website.
So this is a wrap-up on our Shopify HTML sitemap guide. Hope it helps. To get more Shopify tutorials and guides subscribe to our blog for more content.


