
Bulk Shopify URL Redirects: Step-by-Step Setup
Shopify lets you redirect many broken URLs at once two ways: build a CSV with Redirect from and Redirect to columns and import it under Content, Menus, URL redirects, or skip the file with StoreSEO’s Bulk URL Redirect Manager. Either way, a redirect only works once the old URL already returns a 404.
TL;DR: Three Ways to Bulk-Redirect Shopify URLs
| Method | What You Do | Best For |
|---|---|---|
| Native CSV import | Build a two-column file, upload it under Content > Menus | A one-off migration with no app installed |
| StoreSEO Bulk URL Redirect Manager | Add old and new URLs directly in your SEO app | Ongoing redirects alongside your other SEO work |
| Third-party redirect app | Install an app that layers on wildcard or RegEx rules | Large stores with patterned URL changes |
What You Need Before You Start
A bulk redirect import needs three things in place first: a Shopify admin login with permission to edit Content, a list of the old URLs that are actually broken, and the new URL each one should point to. “Actually broken” matters more than it sounds. Shopify’s own documentation, confirmed live 9 Oct 2026, is explicit that a redirect only fires when the Redirect from URL already returns a 404; if the old page still loads, the redirect is created but silently does nothing.
This is also the moment to decide the shape of the project. Renaming a handful of product handles is a five-minute manual job. Retiring a collection, merging duplicate blog posts, or moving to a new theme that changes every URL pattern is a bulk job, and that is what the rest of this guide covers.
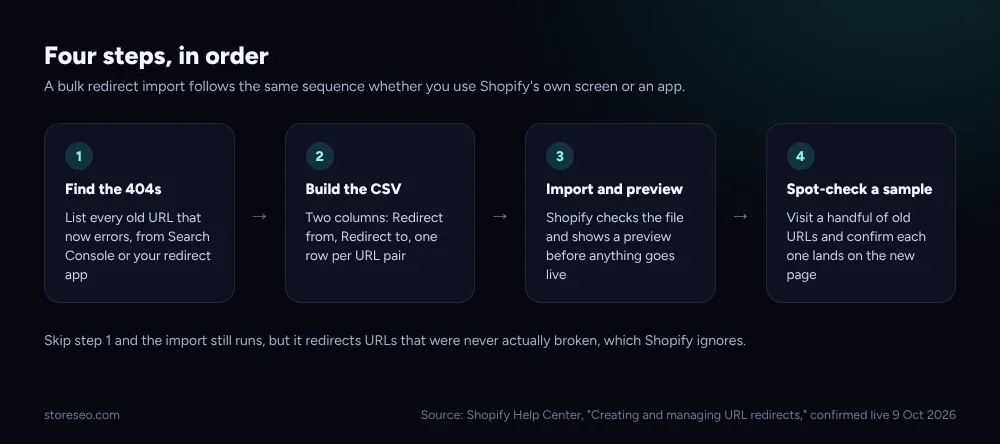 Shopify Help Center, “Creating and managing URL redirects,” confirmed live 9 Oct 2026
How Do You Build the Redirect CSV File?
Shopify’s import only reads two columns, Redirect from and Redirect to, one row per URL pair. Redirect from is the old path without your domain, such as /products/4mm-wrench-set. Redirect to can be a relative path like /products/5mm-wrench-set to stay on your store, or a full URL like https://example.com/ to send traffic off it.
Shopify publishes a sample URL redirect CSV template you can open, clear, and refill with your own rows rather than building the header row from scratch. Keep every URL exact: a trailing slash, a capital letter or a stray space turns a working redirect into a row Shopify silently ignores.
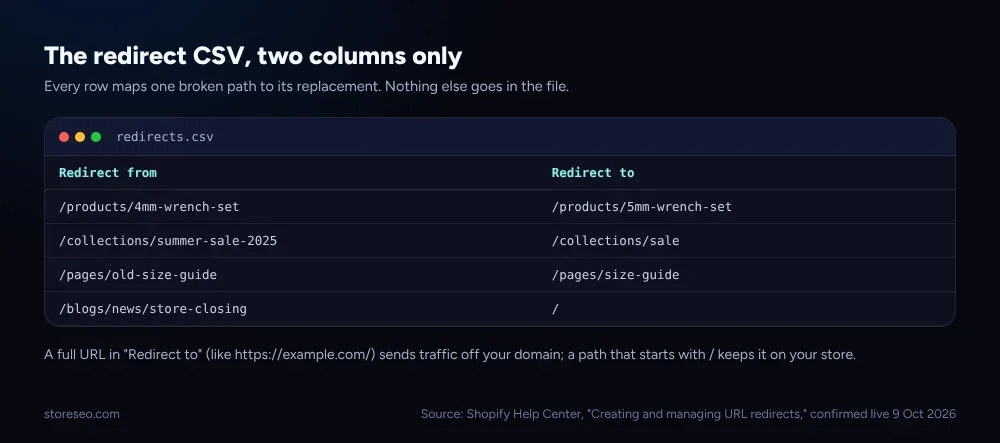 Shopify Help Center, “Creating and managing URL redirects,” confirmed live 9 Oct 2026
How Do You Import Bulk Redirects in Shopify Admin?
From your Shopify admin, go to Content, then Menus, then URL redirects. Click Import, add your CSV file, and click Upload file. Shopify reviews the file and shows a preview of the redirects it found before anything goes live, which is your last chance to catch a bad row. Click Import redirects to confirm, then Close.
The same URL redirects screen is also where you export your current list, as a backup before a big change, and where Edit multiple URL redirects at the same time lets you bulk-edit existing rows instead of deleting and re-importing them.
How Do You Know the Redirects Worked?
Pick a sample of the rows you imported, at least ten on a large batch, and visit each old URL directly in a private browser window. A working redirect lands on the new page immediately; Shopify redirects start working as soon as they save, so there is no propagation delay to wait out.
For the ones you cannot eyeball, a command-line HTTP request to the old path confirms the server response without loading the page in a browser: it should come back with a 301 status and a location header pointing at the new URL. Google Search Console’s Page indexing report is the second check, over the following weeks: the old URLs should move out of “Not found (404)” and the new ones should start appearing as indexed.
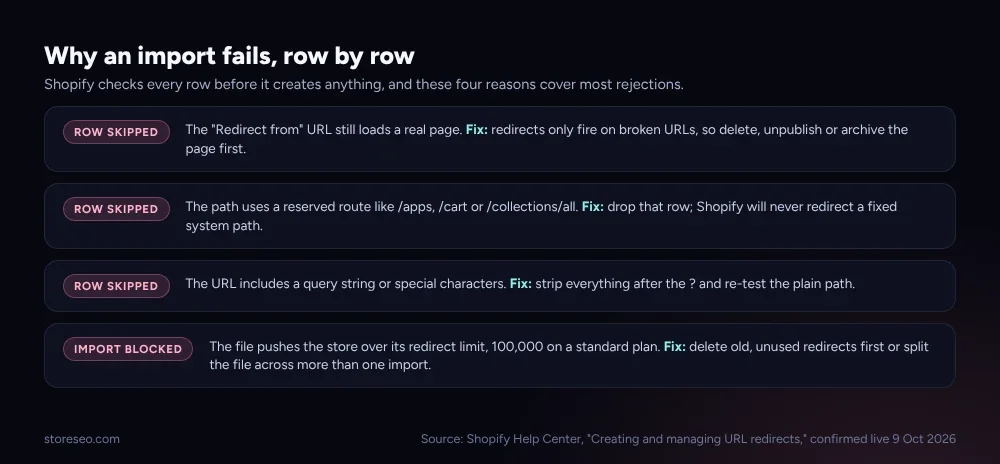 Shopify Help Center, “Creating and managing URL redirects,” confirmed live 9 Oct 2026
What Are the Common Import Errors?
Most rejected rows come down to one of four causes, and Shopify’s own considerations page, confirmed live 9 Oct 2026, names all of them. The Redirect from URL still loads a real page, so the 404 requirement is not met. The path uses a route Shopify reserves for itself, such as /apps, /cart or /collections/all, which can never be redirected. The URL carries a query string or an unusual character that the import cannot parse cleanly. Or the file would push the store’s total past its redirect cap, 100,000 on a standard plan and 20,000,000 on Plus.
A failed row does not fail the whole import. Shopify creates every row that passes and reports the rest in the preview screen, so check that count against the number of rows in your file before you click Close.
Do You Need the Bulk URL Redirect Manager Instead?
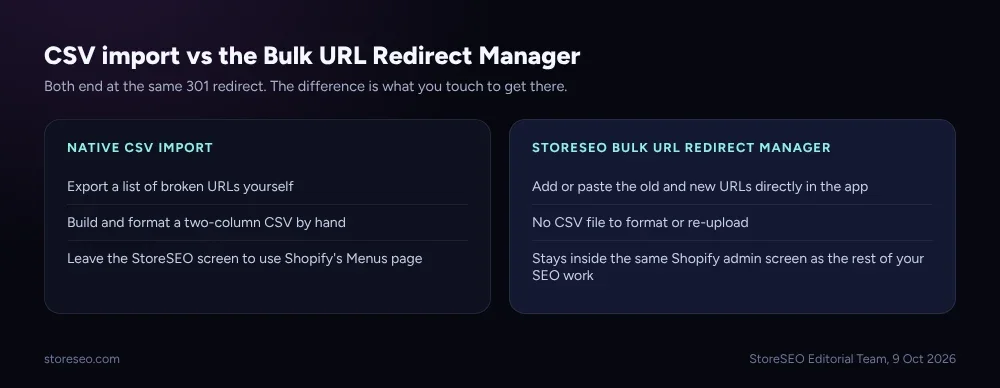
The native CSV route works and costs nothing, but it means leaving your SEO tools to build a spreadsheet correctly formatted for one single purpose. StoreSEO’s Bulk URL Redirect Manager removes that step: you add the old and new URLs directly inside the app, in the same Shopify admin screen where you already manage titles, schema and sitemaps, with no CSV to format or re-upload.
 StoreSEO Editorial Team, 9 Oct 2026
That matters most when redirects are not a one-time migration but an ongoing habit. StoreSEO flags a duplicate or cannibalised URL as part of its regular SEO Analysis, and the Bulk URL Redirect Manager is where you act on that finding without switching screens. It sits alongside StoreSEO’s narrower, already-documented Redirect on Out of Stock setting, which automates one specific case: a sold-out product that is about to turn into a dead end.
Bulk redirects are one piece of a bigger migration checklist. We analyzed 100+ Shopify stores and found exactly why they fail ranking, and orphaned 404s from a past redesign show up often enough to be their own finding. If your traffic drop traces back to a canonical mix-up rather than a dead link, “Google chose different canonical”: the Shopify fix covers that separate cause, and a cannibalised pair of pages is better solved with a merge than a redirect, which fixing keyword cannibalization for Shopify walks through. For single, occasional redirects rather than a batch, StoreSEO’s own guide to creating and managing Shopify redirections covers the one-at-a-time case this guide does not. All three problems, broken links included, are covered at a higher level in common Shopify SEO problems.
Frequently Asked Questions (FAQs)
1. How many redirects can I bulk-import on Shopify?
A standard Shopify plan allows up to 100,000 URL redirects in total, not per import. Shopify Plus stores can hold up to 20,000,000. If an import would push you past the limit, Shopify rejects the rows that exceed it rather than the whole file.
2. Can I undo a bulk redirect import?
Yes. Open URL redirects under Content > Menus, select the rows you want to remove, and click Delete selected redirects. There is no bulk “undo” for an entire import, so removing redirects you imported by mistake means selecting them the same way you would any other redirect.
3. Why didn’t some of my redirects import?
The most common reason is that the old URL is not actually broken yet, so Shopify will not create a redirect for it. Reserved paths, query strings and a redirect count over your plan’s limit are the other three causes, and the import preview screen tells you which rows it skipped before you confirm.
4. Does a bulk redirect keep my old page’s SEO value?
A 301 redirect is Shopify’s default and the correct choice for a permanent change, and it is designed to pass ranking signals from the old URL to the new one over time. It is not instant. Expect Google to re-crawl and transfer authority over days to weeks, not immediately after the import finishes.
5. Can a bulk redirect send traffic outside my Shopify store?
Yes, if the Redirect to value is a full URL rather than a relative path. Use https://example.com/ style entries only when you genuinely want that traffic to leave your store, since a relative path like /collections/new is what keeps a redirect inside your own domain.
Getting bulk redirects right the first time means fewer repeat imports, fewer 404s for Google to re-discover, and SEO value that transfers instead of leaking away during a migration. try StoreSEO on the Shopify App Store
Written by
StoreSEO Editorial Team